---
title: "Advanced Inventory: Item Groups"
description: This article describes how to use Item Groups to manage more advanced inventory needs.
---
[Skip to content](https://support.pantrysoft.com/advanced-inventory-item-groups#main-content)
English
Show submenu for translations
[More support](https://support.pantrysoft.com/kb-tickets/new?hsLang=en)

Open main navigation
Close main navigation
- English
Show submenu for translations
- [More support](https://support.pantrysoft.com/kb-tickets/new)
- [Go to pantrysoft.com](https://app.pantrysoft.com/login)
[Go to pantrysoft.com](https://app.pantrysoft.com/login)
Welcome to the PantrySoft knowledge base. How can we help you?
- There are no suggestions because the search field is empty.
1. [Knowledge Base](https://support.pantrysoft.com/?hsLang=en)
2. [Additional Admin Guides](https://support.pantrysoft.com/additional-admin-guides?hsLang=en)
3. [Inventory Management](https://support.pantrysoft.com/additional-admin-guides?hsLang=en#inventory-management)
# Advanced Inventory: Item Groups
## This article will describe how to use Item Groups to manage more advanced inventory needs.
### Definition
**Item Groups** are a pattern for a bundleof Inventory Items, set at specific quantities. Item groups can contain a set quantity of a *variety* of items:
- Example: Item Group called "Lunch Box" with (1) *Apple*, (2) *Granola Bar*, (1) *Juice Box*, and (1) *Lunchable.*
.png?width=509&height=132&name=Untitled-2%20(4).png)
Or, Item Groups can contain a set quantity of a *single* item. An Item Group is sometimes referred to as a **Case** when it contains only one kind of item:
- Example: Item Group called "Case of 12 Sodas" with (12) individual cans of soda
.png?width=509&height=132&name=Untitled-3%20(1).png)
### When To Use Item Groups
Set up Item Groups for two basic uses:
- **Distributing Groups of Items on a Visit:** Staff can distribute an Item Group like (1) "Lunch Box" Group to a pantry client. This saves them from laboriously adding an identical batch of items during a Visit.
- **Receive/Transfer Groups of Items into Available Inventory**. Staff can receive an Item Group like (5) "Case of 12 Sodas" to the pantry. This saves them from having to 'do the math' to add 60 individual sodas.
**Paid Feature:** Item Groups are an Advanced Inventory feature. Please contact *support@pantrysoft.com* if you'd like to use this feature and don't yet have it activated in your installation.
---
### Establishing Item Groups
There are two methods for establishing Item Groups:
- **Method A: Manual Item Group.** Identify one or more items that belong in a group, specifying quantities. This method can create both Cases (an Item Group that contains only one type of item) and other Item Groups.
- **Method B: Quick-Add for Cases.** While creating a new Inventory Item, quickly auto-create a case of that single item.
#### Method A: Establishing an Item Group Manually
Navigate to Item Groups by going to **Inventory → Item Groups**.
You can add groups directly from the Item Groups page by clicking on  in the upper right corner of the page and then selecting the individual items and quantities that belong in the Item Group:
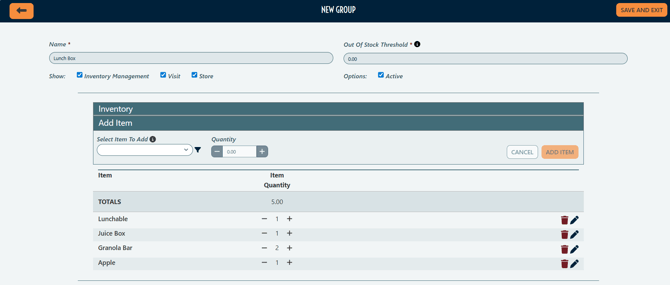
Step 1: Name the Group

Step 2: Select where the Group should Show. *By default, new Item Groups do not show on Store. Select the Store checkbox if you want this Item Group visible on the Client Portal storefront. See more details in the "Item Groups on Storefront" section below.*

Step 3 (optional): Set an Out of Stock Threshold

Step 4: Select Item(s) and quantity(ies) for the Item Group and Add Items

Step 5 (optional): You can configure how the Item Group is displayed on the Client Portal storefront.
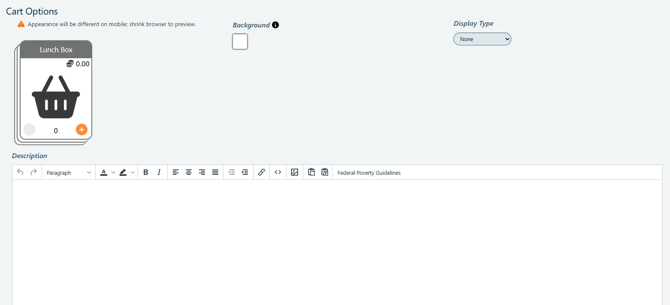
Step 6: Remember to click "Save and Exit" to save your changes!
#### Method B: Quick-Add a "Case" on New Inventory Item screen.
When adding a new inventory item you can also create a case (group) for that item by entering a case and the quantity of the item within the case. For example, while building a Pasta Box item, auto-build an item Group for "Case of (12) Pasta Boxes".
On the New Inventory Item screen you will see this just below item limits one you have Item Groups enabled:

Once you have added a new item and a case for that item, you will now be able to receive that item individually or, as a case and you can do the same with distributions.
---
### Item Groups on Storefront
When an Item Group is configured to show on "Store", it will be visible on the Client Portal storefront. Groups can be distinguished from other Items on the storefront by the hexagonal shape of the Item Type icon, and the 'stacked' Item Group card design.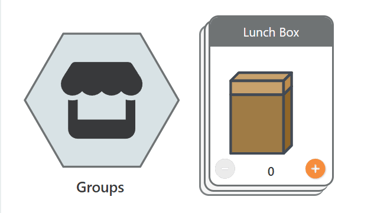
**Details:**
- Item Groups that contain a variety of items will appear on the storefront in a single row (like the "Lunch Box" and "Small Family Box" example below). Cases - an Item Group that contains only one type of item - will appear in the same row as the individual Item (like the "Size 1 Bundle" of diapers example below).
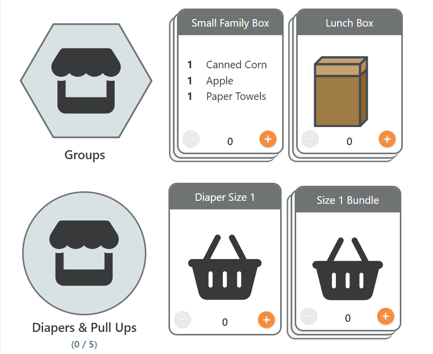
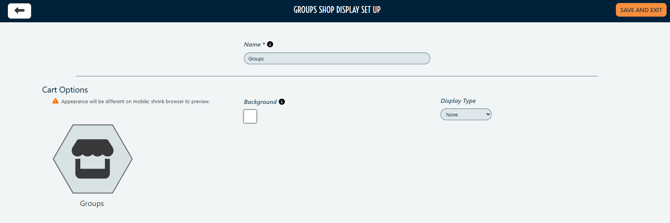
- Configure how the hexagonal Groups icon displays by going to Inventory \> Item Groups \> click "Groups Shop Display" in the upper right-hand corner of the screen:
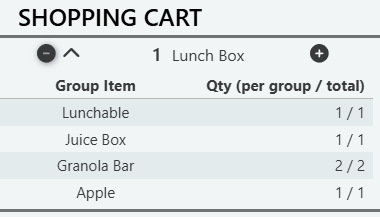
- Groups can be expanded in Cart on Checkout to see Group breakdowns
**Additional information:**
- Item Tags can not currently be assigned to Groups.
- If you have Credits assigned to Items, the cost of the Group will be a combination of all Items in the Group.
- Visit Limits for Group are determined at the Item level. Visit Limits for the Group will respect limits assigned to each Item.
---
### Item Group Distribution Setting
PantrySoft manages a setting that determines how your account handles Item Group distributions:

The **default setting** is that when you add an Item Group to a visit or distribution record, it will pull the individual contents from Available Inventory Items. For example, distributing an Item Group that is a "Case of Black Beans" (24 Black Bean cans) will pull 24 *individual cans* from Available Inventory Items.
If this setting is changed to **No**, your account will distribute Item Groups from your Available Inventory Groups. Using the same example, distributing a "Case of Black Beans" (24 Black Bean cans) will pull 1 group from Available Inventory Groups.
For more details, watch the [Items Groups Setting video](https://zoom.us/clips/share/j6j3WPruTxi1qpGQ-_BjBw). Please contact *support@pantrysoft.com* if you have questions about your account's current setting.
---
### How Item Groups are Received into Available Inventory
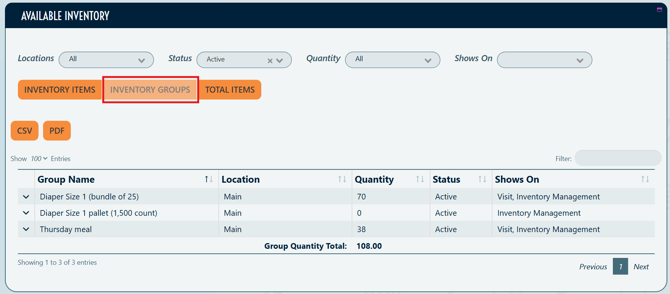
Item Groups are received into inventory as Groups, not as individual items. This means the contents of the group are not automatically broken down. Instead, your Available Inventory displays a separate tab for the Item Groups in your inventory:
**Previously**: When you received an Item Group, it was automatically broken down into its individual items. This workflow has changed. To view the original update announcement, see: [Item Group Management (New as of July 23rd, 2025)](https://support.pantrysoft.com/group-management-new-as-of-july-23rd-2025?hsLang=en)
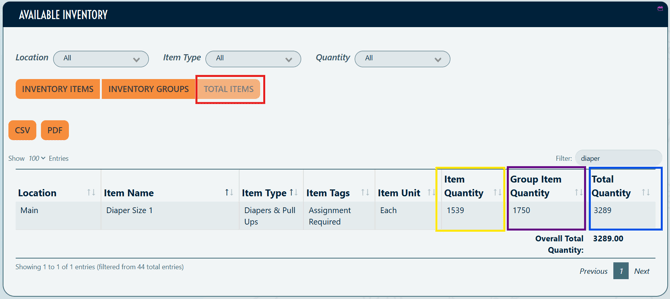
You can also view the total items in your Available Inventory with the "Total Items" tab. This tab shows the stock of individual items (yellow box) + items in groups (purple box) for a total item quantity (blue box):
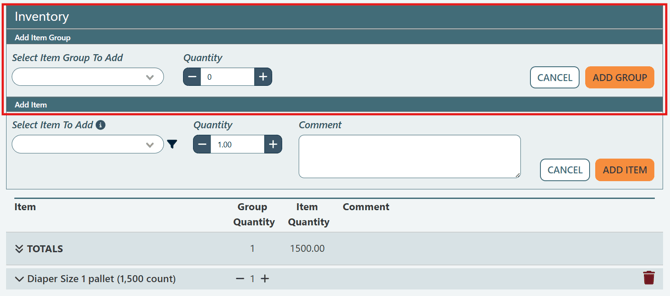
Receiving Item Groups into inventory follows the same steps as receiving individual items. For a refresher, check out our article on [Inventory Receives.](https://support.pantrysoft.com/inventory-receives?hsLang=en) When Item Groups are enabled on your account, you will have the option to select an Item Group to add on a new receive record:
---
### Groups Breaker & Group Builder
#### Group Breaker
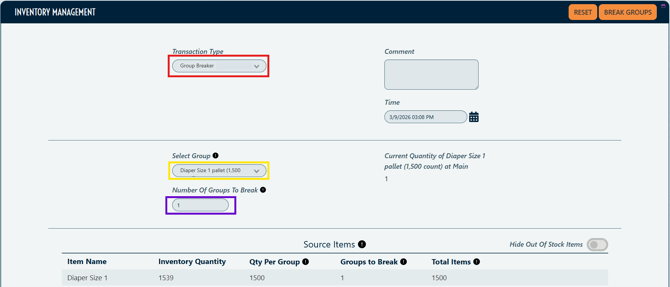
To distribute the individual items within a received Group, use the **Group Breaker** action. This will 'break' an Item Group into the individual items that make up the group.
1\. Go to **Inventory → Inventory Management**
2\. Under **Transaction Type** (red box), select "Group Breaker".
3\. Then, you will have the option to **select** which type of group you want to break (yellow box).
4\. Next, type in the **number** of groups from your current group inventory that you want to break into individual items (purple box).
5\. Finally, click the orange "Break Groups" button in the upper right-hand corner of the screen.
**Video Tutorial**: The video below walks you through the steps of receiving in Item Groups and breaking them down into individual items:
#### Group Builder
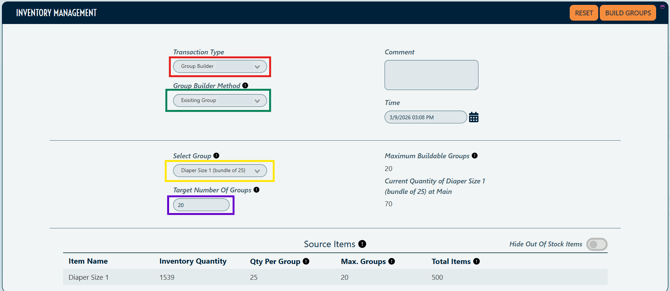
To add to your Item Group inventory from your current inventory, use the **Group Builder** action**.** This will 'build' a groupfrom individual items in your Available Inventory.
1\. Go to **Inventory → Inventory Management**
2\. Under **Transaction Type** (red box), select "Group Builder".
3\. For **Group Builder Method** (green box), select "Existing Group". You can also establish and build a new Item Group from this screen by selecting "New Group".
4\. Then, you will have the option to **select** which type of group you want to build (yellow box).
5\. Next, type in the **number** of groups that you want to build from available individual items (purple box). If you are trying to build more groups than are possible with your available inventory, this action will only build the "Maximum Buildable Groups".
6\. Finally, click the orange "Build Groups" button in the upper right-hand corner of the screen.
**Video Tutorial:** The video below walks you through the steps of building existing and new Item Groups from your individual item inventory:
---
### Viewing Item Groups in Reports
Item Groups are a "record" in PantrySoft in and of themselves. But so are the items they represent. This means that on Inventory Reports (**Reports → Inventory Reports** ), you can choose which "fact" you care about: the outgoing or incoming *Group*... or the incoming/ outgoing *Items* the Group(s) *represented*. You can see reports showing Inventory Group activity in two different views:
- **By Item.** Monitor counts of incoming or outgoing *Inventory Items* created/ added via Inventory Groups (i.e. the actual items in the Lunchbox Group, or the 12 actual *Can of Soup* Items in the *Case of (12) Soup* Group.
(Most Inventory Reports are Item-based; to see these reports, just use any Item-based reports you're already using, for instance ***Visit Distributions by Item***.)
- **By Group.** Monitor counts of incoming or outgoing *Inventory Groups* that were attached to various (Client) Visits as well as (bulk item) Movements.
(To see Group-based reports, run *Visit Distribution by Item Group* or *Movements by Item Group*.)
- [Getting Started](https://support.pantrysoft.com/getting-started?hsLang=en#main-content)
- [Users](https://support.pantrysoft.com/getting-started?hsLang=en#users)
- [PantrySoft Interfaces](https://support.pantrysoft.com/getting-started?hsLang=en#pantrysoft-interfaces)
- [Inventory](https://support.pantrysoft.com/getting-started?hsLang=en#inventory)
- [Guest/Client Registration](https://support.pantrysoft.com/getting-started?hsLang=en#guest-client-registration)
- [Visits](https://support.pantrysoft.com/getting-started?hsLang=en#visits)
- [Client Portal - Scheduling](https://support.pantrysoft.com/getting-started?hsLang=en#client-portal-scheduling)
- [Reporting](https://support.pantrysoft.com/getting-started?hsLang=en#reporting)
- [Additional Admin Guides](https://support.pantrysoft.com/additional-admin-guides?hsLang=en#main-content)
- [Client Registration & Visits](https://support.pantrysoft.com/additional-admin-guides?hsLang=en#client-registration-visits)
- [Additional Features](https://support.pantrysoft.com/additional-admin-guides?hsLang=en#additional-features)
- [Inventory Management](https://support.pantrysoft.com/additional-admin-guides?hsLang=en#inventory-management)
- [Additional Paid Features](https://support.pantrysoft.com/additional-admin-guides?hsLang=en#additional-paid-features)
- [Tags](https://support.pantrysoft.com/additional-admin-guides?hsLang=en#tags)
- [Scheduling Appointments](https://support.pantrysoft.com/additional-admin-guides?hsLang=en#scheduling-appointments)
- [Scheduling and Schedule Templates](https://support.pantrysoft.com/scheduling-and-schedule-templates?hsLang=en)
- [User Interfaces](https://support.pantrysoft.com/user-interfaces?hsLang=en#main-content)
- [Client Portal/ Online Store- Admin & Setup Guides](https://support.pantrysoft.com/user-interfaces?hsLang=en#client-portal-online-store-admin-setup-guides)
- [Client Portal/ Online Store- Customer Guides](https://support.pantrysoft.com/user-interfaces?hsLang=en#client-portal-online-store-customer-guides)
- [Packing/ Kitchen Screens and Reports](https://support.pantrysoft.com/user-interfaces?hsLang=en#packing-kitchen-screens-and-reports)
- [Special Workflows](https://support.pantrysoft.com/special-workflows?hsLang=en#main-content)
- [Delivery/Meals on Wheels](https://support.pantrysoft.com/special-workflows?hsLang=en#delivery-meals-on-wheels)
- [University](https://support.pantrysoft.com/special-workflows?hsLang=en#university)
- [FAQ & Miscellaneous](https://support.pantrysoft.com/faq-miscellaneous?hsLang=en#main-content)
- [Client Troubleshooting](https://support.pantrysoft.com/faq-miscellaneous?hsLang=en#client-troubleshooting)
- [Other FAQs](https://support.pantrysoft.com/faq-miscellaneous?hsLang=en#other-faqs)
- [Messaging and Notifications](https://support.pantrysoft.com/faq-miscellaneous?hsLang=en#messaging-and-notifications)
- [Other Reports](https://support.pantrysoft.com/faq-miscellaneous?hsLang=en#other-reports)
- [Technical Documentation](https://support.pantrysoft.com/faq-miscellaneous?hsLang=en#technical-documentation)
- [Reporting Tools](https://support.pantrysoft.com/reporting-tools?hsLang=en#main-content)
- [Merging Duplicate Client Accounts](https://support.pantrysoft.com/reporting-tools?hsLang=en#merging-duplicate-client-accounts)
- [Release Notes](https://support.pantrysoft.com/release-notes?hsLang=en#main-content)
- [2026 Releases](https://support.pantrysoft.com/release-notes?hsLang=en#2026-releases)
- [2025 Releases](https://support.pantrysoft.com/release-notes?hsLang=en#2025-releases)
- [2024 Releases](https://support.pantrysoft.com/release-notes?hsLang=en#2024-releases)
- [Recorded Webinars](https://support.pantrysoft.com/recorded-webinars?hsLang=en#main-content)
- [2026 Webinar Recordings](https://support.pantrysoft.com/recorded-webinars?hsLang=en#2026-webinar-recordings)
- [2025 Webinar Recordings](https://support.pantrysoft.com/recorded-webinars?hsLang=en#2025-webinar-recordings)
- [Special/ Niche Features](https://support.pantrysoft.com/special-niche-features?hsLang=en)
- [Advanced Inventory](https://support.pantrysoft.com/advanced-inventory?hsLang=en)
- [CSFP Module](https://support.pantrysoft.com/csfp-module?hsLang=en#main-content)
- [CSFP Overview](https://support.pantrysoft.com/csfp-module?hsLang=en#csfp-overview)
- [Managing CSFP Participants](https://support.pantrysoft.com/csfp-module?hsLang=en#managing-csfp-participants)
- [Recording CSFP Visits](https://support.pantrysoft.com/csfp-module?hsLang=en#recording-csfp-visits)
- [CSFP Data Management](https://support.pantrysoft.com/csfp-module?hsLang=en#csfp-data-management)
- [PantrySoft Volunteer](https://support.pantrysoft.com/pantrysoft-volunteer?hsLang=en)
# PantrySoft
pantrysoft.com Help Center
Copyright © 2026, PantrySoft