
- An Appointment is someone's stated intention to come in. On its own it isn't a service record and doesn't appear in standard visit reporting.
- A Visit is the record that they actually showed up and were served.
Checking someone in on this screen adds a corresponding visit record for their appointment, confirming they arrived and received services. Without it, the only way to record that a scheduled person arrived is to open their record and create the Visit by hand, one at a time.
How to access:
Access is controlled by the Appointment Management Additional Role at the User level, which is off by default. Turn it on for the staff who need it.
User Management > open the User record > select Appointment Management under Additional Roles
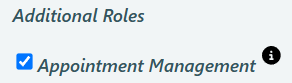
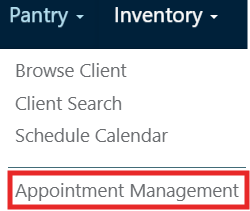
Once the Additional Roles are assigned, you can access Appointment Management.
Pantry > Appointment Management
On this screen, you will be able to filter the Appointments you want to manage. You can filter by date range, Visit Type, location (if you have more than one), and Appointment status.
Appointment status automatically filters to Not Checked In, which is the working list for most of the day. You can also filter to Missed to see any Appointment already marked Missed, or filter to Checked In to see any Appointments that you've already checked in from this screen.
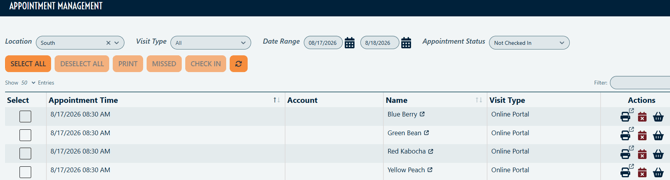
Once an Appointment is checked in, it now has an associated Visit — you'll can take further actions with this Visit on the Visit Management screen.
Use the checkbox on each row, or select all, then choose an action:
| Action | What it does |
|---|---|
| Check In | Creates the Visit for that Appointment |
| Mark Missed | Flags the Appointment as missed |
| Prints reminders for the selected Appointments |
What "Check In" does
Checking someone in creates a Visit and links it to their appointment. A few details worth knowing:
- The Visit's start and end times come from the scheduled Appointment time, not the moment you click Check In. If you need the actual arrival time recorded, edit the Visit afterward.
- In the volunteer platform, a task is also created automatically on the shift (Visit), using the default task type and the Default Amount of Time for Volunteer Tasks. You can edit the task if someone stayed longer or shorter than the default.
- The Appointment drops off your Not Checked In list, and the new Visit appears on the Visit Management screen, where you can add inventory, adjust the time, edit tasks (for volunteer platform), or fulfill it.
Marking an Appointment missed
Marking a not-checked-in Appointment as missed doesn't delete anything since there's no Visit linked to it yet.
If someone shows up late, or you marked the wrong person: filter appointment status to Missed, then check them in. That clears the missed flag and creates the Visit as normal.
If you don't want certain Users marking Appointments missed, please contact support@pantrysoft.com to make changes to your settings.
Which screen should we use?
Most organizations only need one of the two. Match the screen to the way you use the client portal.
| How you work | Use |
|---|---|
| Online ordering through the Client Portal. Placing an order creates the Appointment and the Visit together. | Visit Management only. Nothing shows up on Appointment Management, because the visits already exist. |
| Online scheduling only, no ordering — volunteer shifts, or Appointment-only pantries where people book a slot and shop on arrival. | Appointment Management only. |
| Waiting-room or drive-thru setup — people check in at the front, staff pack in the back. | Both. Front desk checks people in on this screen; the back room watches Visit Management, packs, and clicks Fulfill Visits when the order goes out. |
If you're running the two-station setup in the third row, the two screens are deliberately separate so two people can work them at the same time from different parts of the building.
Additional Details:- Create Visits from this screen, not the Dashboard. If you create a Visit manually from the dashboard for someone who has an Appointment, the two records won't be linked. Use Check In here instead.
- The "Legacy" badge. Appointments scheduled before the Appointment Management screen existed carry a legacy flag. They may already have a visit attached that was created the old way, so the link between the two may not display correctly.
- Marking a visit missed on Visit Management deletes that Visit and marks the Appointment missed — so you end up in the same place whichever screen you use. The deletion only ever happens from the Visit Management side.
- Checked-in Appointments can't be undone from this screen. To reverse a check-in, go to the Visit Management screen and remove the Visit.
- If you would like to split first and last name columns on the Management Screens, go to Set Up > Visit Settings > Split Name Columns on the Management Screen
