
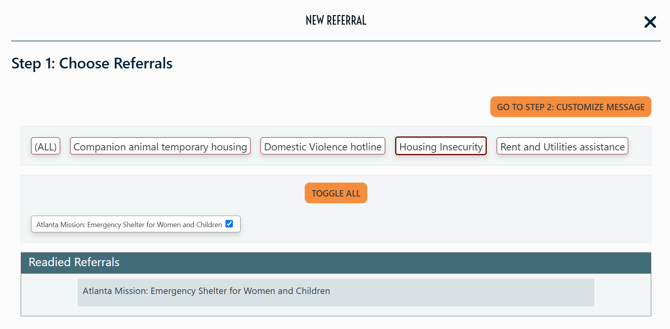
Consultation: Step 1, Choose Referrals
(Housing Insecurity group selected)

Consultation: Step 2, Customizing the Message
(Specific Referral
now readied for emailing)
Definition
A Consultation is a record of client / staff recommendations (Referrals) to external community services. A Referral is a preset message containing referencing an outside service that could benefit your client. Once you complete a Consultation— sending one or more Referrals to the Client— PantrySoft also features a Consultation Review screen that lets you track the status or outcome of these consultations (see figure just below). Currently, Consultations and Client Notes are PantrySoft's two major "case management" features (see Client Notes).
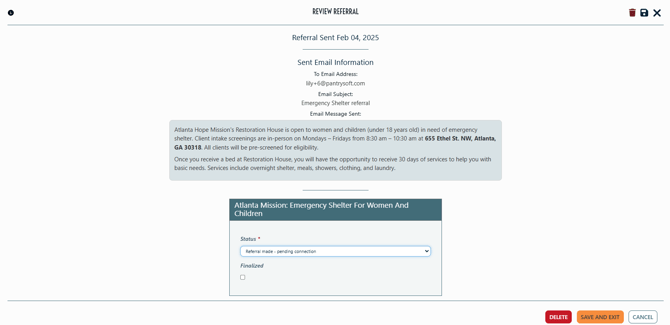
Consultation Review Screen
(Note: Status and Finalized tracking fields)
Consultation Setup
Overview
Setting up Consultations is a multi-step process, as follows:
- Enable Referrals Feature. Go to Setup-> General Settings and turn this setting on:

- Create a set of Referrals. Create pre-set messages to send to your Clients about services peripheral to your pantry.
- Create a set of Referral Types (optional). Create filters for grouping referrals.
- Assign Referrals to One or More Referral Types (optional). Assign those filters.
Referral Setup / Creation
Follow these instructions to create custom service referrals to provide to your clients.
Referrals are used to store contact information for external community services. They can then be quickly referenced during a consultation to inform a client how to contact that service.
- Access the Referral Page
Navigate to Setup -> Referrals.
- Open a New Referral Record
Click New Referral. - Create Your Referral
Enter the contact information for your referral. Only the Name field is required, and either the SMS Text field or the Email Text field. If you've set up Referral Types (categories/ filters... see Referral Types below) use the Referral Type checkboxes to indicate the type (category) of the referral.
Optionally, the SMS Text field can be used to enter text regarding the provided referral that can be instantly sent to the client after a consultation. The Email Text field is similar, but instead allows you to instantly send a pre-loaded email to the client. Both are typically used to provide a referral's contact information to a client.


- Save Your New Referral
Click Save and Exit to record your new entry and return to the previous screen. Click the <- button to return to the previous screen without saving your changes.
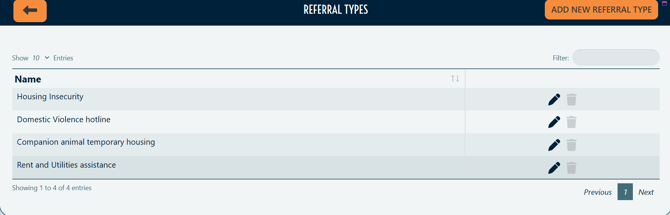
Referral Type Setup / Creation (Optional)
Referral Types are a category you can assign to referrals. This helps staff to quick-ready a cluster of referrals based on a Client's need (i.e., someone with housing insecurity might need directions to a local shelter, and also maybe to the local clothing thrift store). Note that you can associate a single referral with multiple referral types (i.e., multiple Client situations/ needs).
Follow these instructions to create referral types used to categorize referrals:
- Open the Referral Type Table
Navigate to Setup -> Referral Types. This option only appears after Consultations have been turned on in General Settings. - Access the Referral
Click New Referral Type. To edit an existing Referral Type's name, click Edit in the target row. - Create the New Referral
Enter a name for the referral type. Click Save and Exit to record the new entry. Click the <- button to return to the previous screen without saving.
Consultation Status Setup
The Consultation Status picklist is used to populate a drop-down menu in the Consultation Review screen (See Consultation Review Screen above for an example screen capture or see the Reviewing a Consultation section below for more detail). Each referral has its own picklist menu that can be used to track a client's usage or interest in external community services.
Follow these steps to create Consultation Status picklist options for referral status (referral statuses appear next to every referral in the Referral Review screen— see Reviewing a Referral below):
- Access the Picklists
Navigate to Setup -> Question Picklists. -

- Open the Picklist
Click Edit in the row marked Consultation Status. - Add Desired Options
Enter your picklist choices for tracking consultation status. This should be a word or simple phrase that will be selectable next to each referral.
Usage of these can vary widely, depending on the needs of your organization. For example: "Not Interested", "Referred", "Confirmed Received Services", "Previously Referred", etc. - Save the Picklist
Click Save Picklist to record your new entries and return to the previous screen. Click the <- button to return to the previous screen without saving your changes.
Sending Consultations
This section explains how to send a series of referrals to the Client through the dashboard Consultation feature. Follow these steps to send a set of referrals (conduct a consultation):
- Access a Client Record
Navigate to the Staff Dashboard and load the target client into your interface. - Open a New Consultation
Click New Referral in the "Activity" widget on the right side of the Staff Dashboard.
- Step 1 Screen (Choose Referrals)
Selecting and sending referrals is a two-step process. The first screen is a referral chooser, where you assemble the referrals appropriate to the Client. When you've added the appropriate referrals to the Readied Referrals section, click Go to Step 2: Customize Message.
PantrySoft provides several tools on the Step 1 screen to help you navigate the referrals you've added to the system:- Referral Type Filter. The top section lists referral type filters, which will narrow the list of referrals immediately below.
- Referral Chooser. The second section lists the referrals themselves, which you can toggle on or off. This adds their description to the Readied Referrals list below.
- Toggle All. Click this button to select or de-select all the referrals currently shown in the Referral Chooser.
- Step 2 Screen: Prepare SMS Messages (Optional)
If you're preparing to send referrals via SMS/ text messaging, perform the following steps:- Toggle Ready SMS Text to prepare an SMS/ text message with your chosen referrals.
- Verify the Client's phone number in the Phone field.
- Change the SMS message however you'd like from the default message populated from the referral(s) Address and Email Subject fields are correct.
- Step 2 Screen: Prepare Email Messages (Optional)
Perform the following steps to finalize and send referral messages to the Client via SMS:- Toggle Ready Email Message to prepare an email message with your chosen referrals;
- Verify the Client's email address in the Email Address field.
- Change the Email's subject line and content however you'd like from the default message populated from the referral(s).
- Step 2 Screen: Send Readied Messages.
- Click the Finalize: Send SMS and Email button when you've modified your SMS and/or email messages to your liking.
Consultation Reviews
Once you've completed a Consultation and your messages have been sent, you can open a Consultation Review screen and record details about the outcome of your various referrals. Once it's complete, a Consultation shows up in the Activities portion of the dashboard just like Visits and Appointments.
Perform the following steps to review a consultation:
- Open the Consultation
Click the Edit Pencil next to the consultation you'd like to review. - Change Status Fields as Necessary
Each Referral typically represents a recommendation to an outside agency. Some pantries further monitor the progress of each of their referrals by asking returning Clients about the status of previous referrals. Pantrysoft lets you record these changes to point to a present list of Status(es) and/or to signify the referral culminated in some sort of conclusion (signified by a checked Finalized checkbox).
Change the status field to reflect any progress the Client reports to you. - Save and Exit
Click Save and Exit to finalize changes to the referral.