
Definition
A Custom Question in PantrySoft is a question you build and attach to client intake screens. It is how you will capture more than just the most basic contact information for a client.
There are three kinds of Custom Questions:
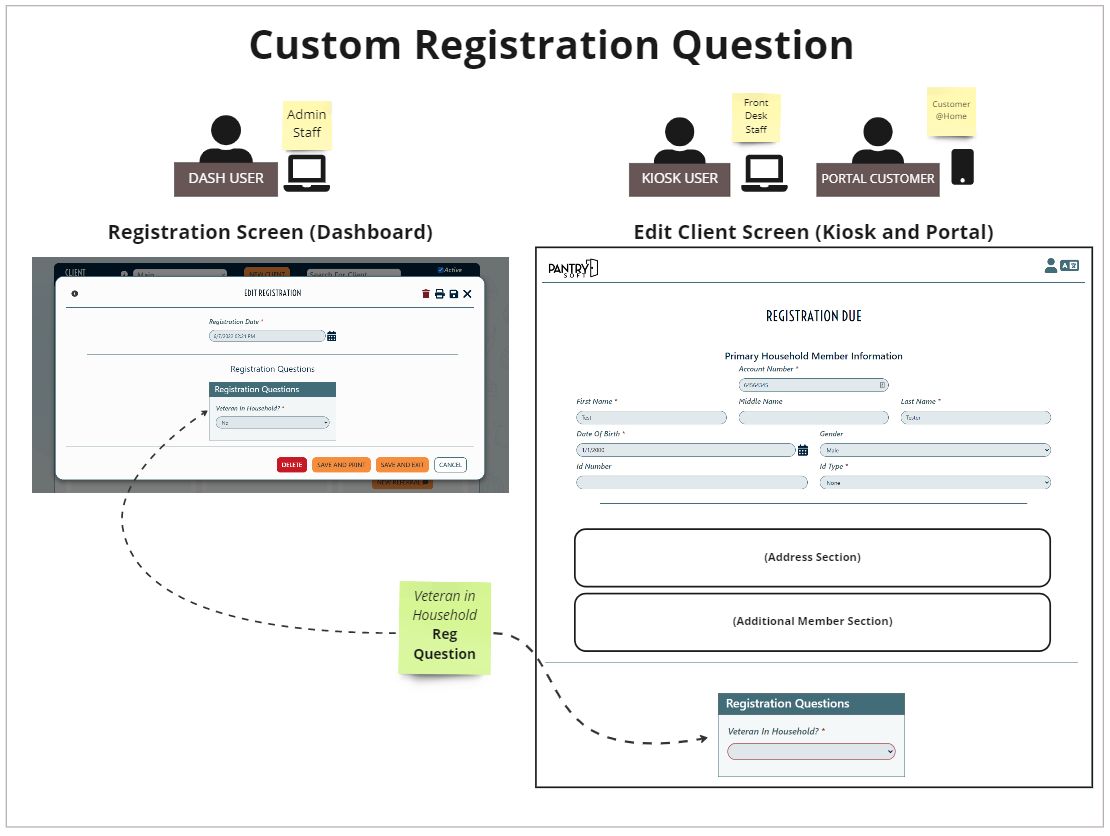
- Registration Questions gather information per household, per Registration.
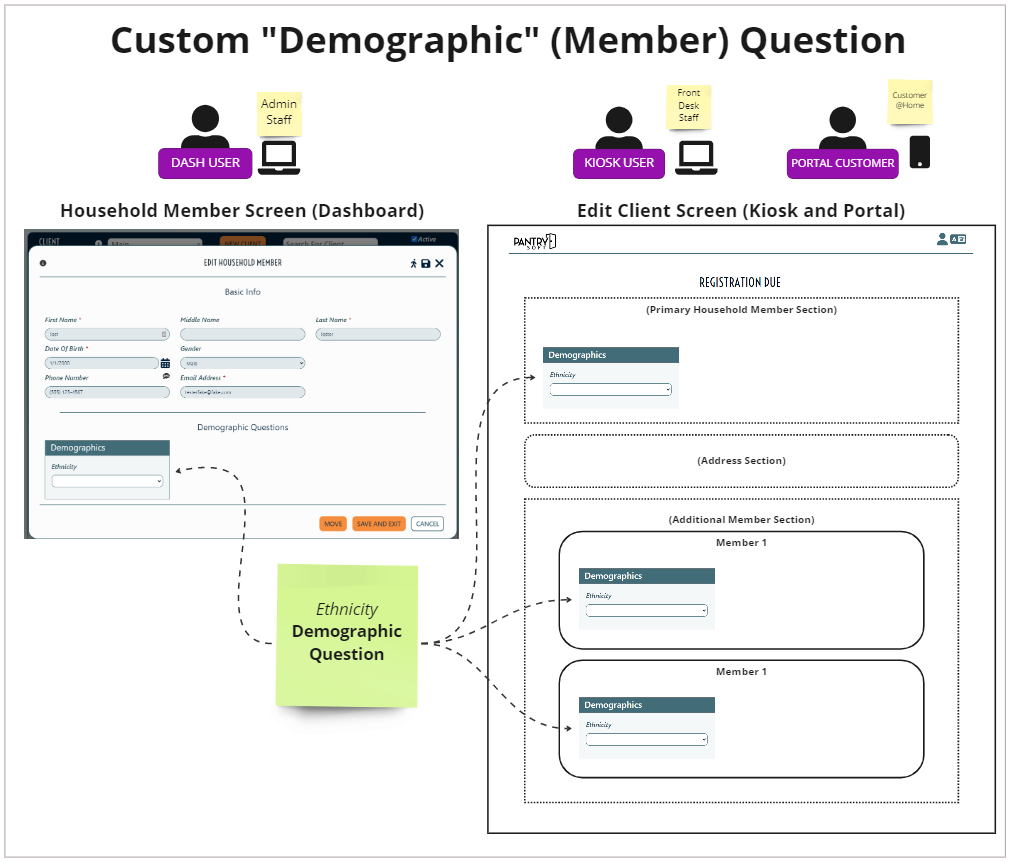
- Demographic Questions gather information per each household member.
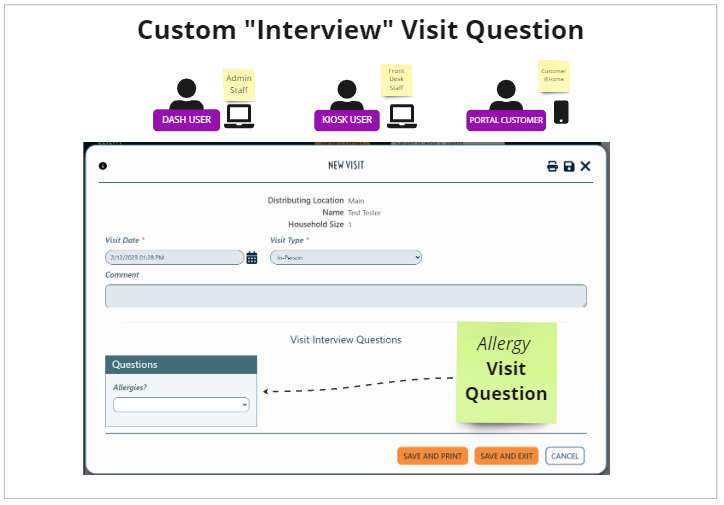
- Interview (Visit) Questions gather information per household, per Visit.
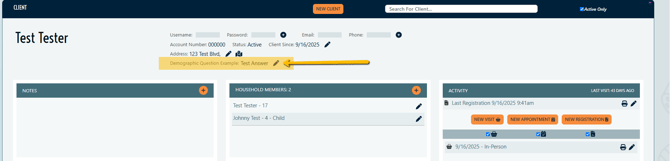
Feature Demographic Questions on Client Record Header
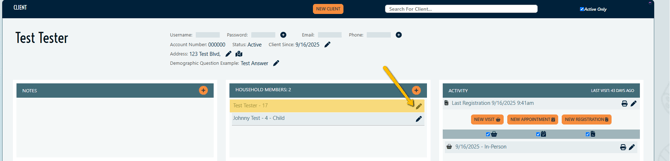
Head of household responses to Demographic Questions can now be featured at the top of the client record:
How to access:
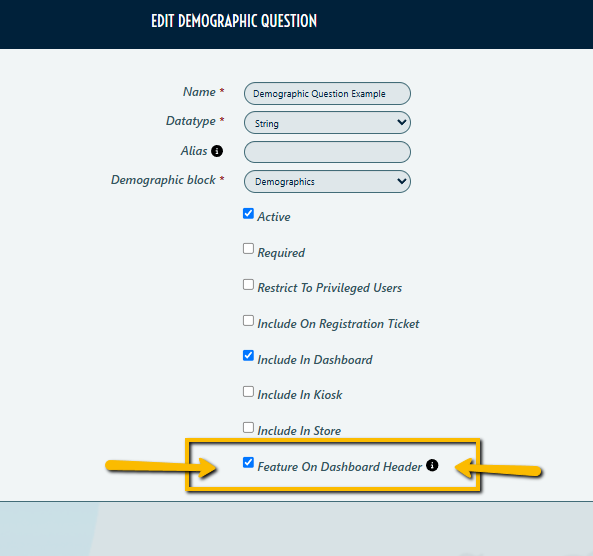
- To feature an existing demographic question:
Setup > Demographic Questions > select the edit pencil icon to open a specific demographic question > select “Feature on Dashboard Header” checkbox
- To create a new demographic question for featuring:
Setup > Demographic Questions > select New Question > configure your demographic question appropriately > select “Feature on Dashboard Header” checkbox
To update a household member’s response to a demographic question, you have two options:
- From the header: Select the edit pencil icon on the featured question itself from the client record header.
- From the household member widget: Select the edit pencil icon on the head of the household member’s row.
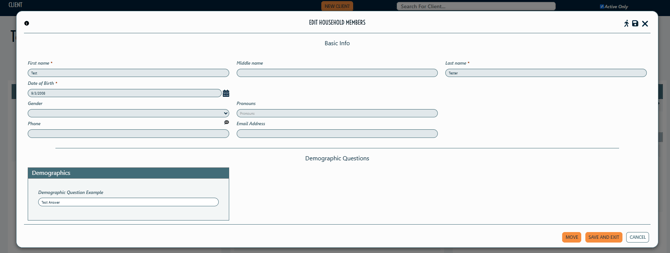
Both of the options above will open the head of household’s member form:
Notes:
- For visual clarity, it is recommended to only feature a couple of demographic questions at the top of the client record.
- Only the head of household’s response to demographic questions will appear at the top of the client record.
Once these questions are created, they can be included in various reports. To obtain these custom reports, please reach out to the PantrySoft Customer Success team by navigating to Support Tab and selecting Report Request.
Create or Edit a Custom Question
A brief how-to:
For more detailed information about building a Custom Question, refer to the steps below:
Part A: Which Custom Question Type?
To create or edit a custom question, determine which of the three question types you're concerned with (Demographic, Registration, or Visit) and click on the appropriate menu item:

For the rest of this article, we'll use Registration questions as the example, but all three varieties work the same way.
Part B: Edit or Create the Question
Perform the following steps to create a new question:
- Access the Chosen Custom Question Screen
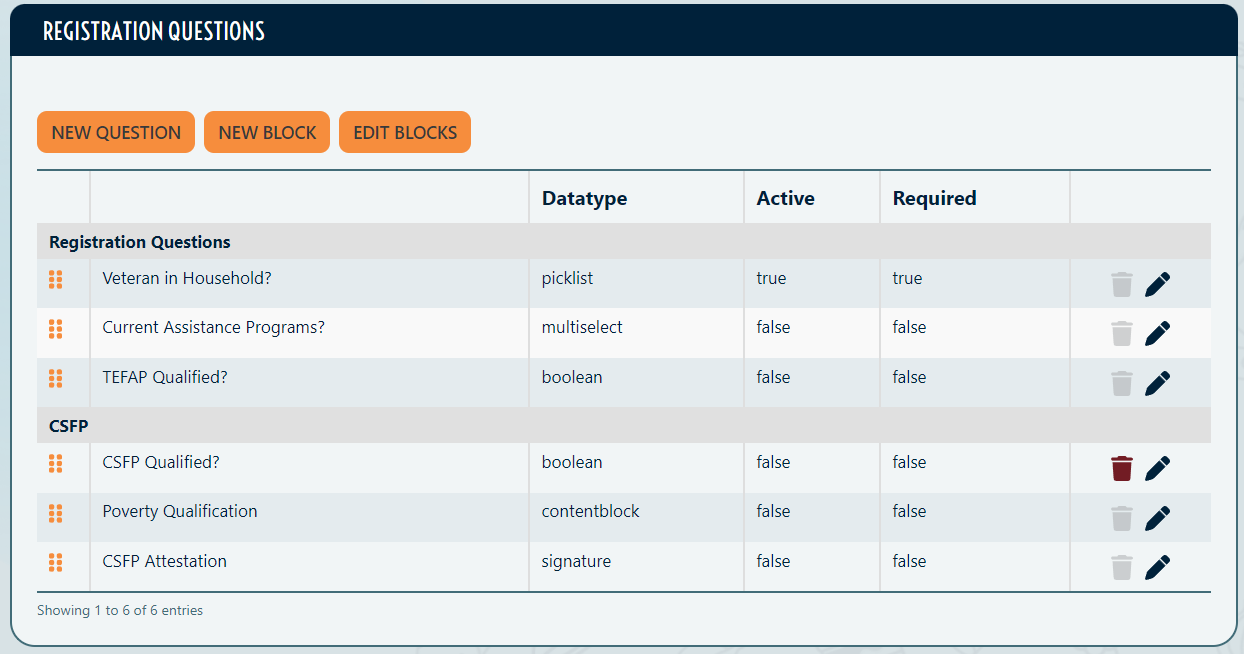
Navigate to Setup-> (Registration) Questions. This will show you a table of existing Registration questions. - Create a New Question
Click New Question. This will take you to the New Registration Question screen. - Enter Question Name
Record a name for the question. This is the question label that will appear above the question. - Choose a Data Type (see Question Types below)
Assign it a Data Type; this determines the look of the question and what kind of data you'll accept from the User. - Choose a Question Block
Assign the question to a question block you’ve created before-hand. - Assign a Picklist (Picklist Question or Multiselect Questions only)
Choose a picklist (set of choices) for the question. If you haven't crafted one yet, go to Part C and return to this step.
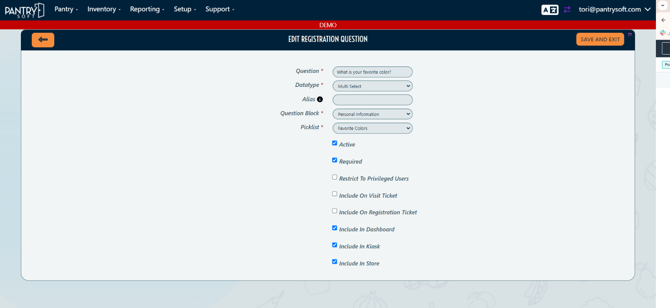
What do the check-boxes impact?
- Active = For this Registration Question to appear anywhere, this check box MUST be checked
- Required = If this box is checked, this will be a required question for your clients to answer before they can save the intake screen where it appears
- Restrict to Privileged Users = If a User has the Additional Role "Privileged" checked (see Setup > Users > edit pencil icon next to their name to check) and this box is checked, only those users can see a client's answers to these questions
- Include on Visit Ticket = If this box is checked, your clients' answer to this question will be printed on their Visit Tickets
- Include on registration Ticket = If this box is checked, your clients' answer to this question will be printed on their Visit Tickets
- Include in Dashboard/Kiosk/Store = These boxes must be checked for these questions to appear in the other two interfaces. (You can preview those interfaces in the images above)
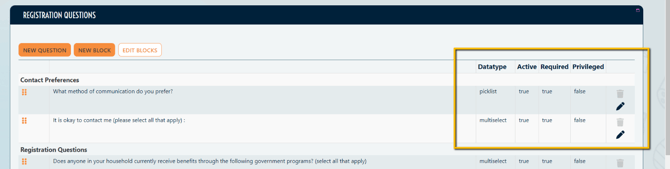
You can always preview the status of a given question's check boxes on the Question Type's landing page. "True" indicates that Check Box is indeed selected:
Question ("Data") Types
This is a complete list of all the question formats - aka "data" types - available
(See image below for an example of each) :
- String. A thin textbox for entering a single line of text.

- Integer. Looks like a string box but will ensure only whole numbers are added.

- Decimal. Looks like a string box, but will ensure only numbers are added, decimals permitted.

- Currency. Acts like decimal but supplies a dollar sign and restricts the decimal to two places.

- Checkbox. A simple checkbox.
Note: If you use a checkbox and set that question to "required", the box must be checked to move beyond that question.
- Text. Should be called Large-Text. It’s a multi-line text box for entering things like comments.

- Date. Field that comes with a date-picker widget when you click on it. It will only record calendar day, not time of day.

- Date Time. Acts like Date except it also records time of day.

- Picklist. Dropdown selector that provides a set of pre-defined choices. Allows only one choice. (see Step C)

- Multi-Select. Acts like Picklist type, except user can select multiple choices from the list. (see Step C)

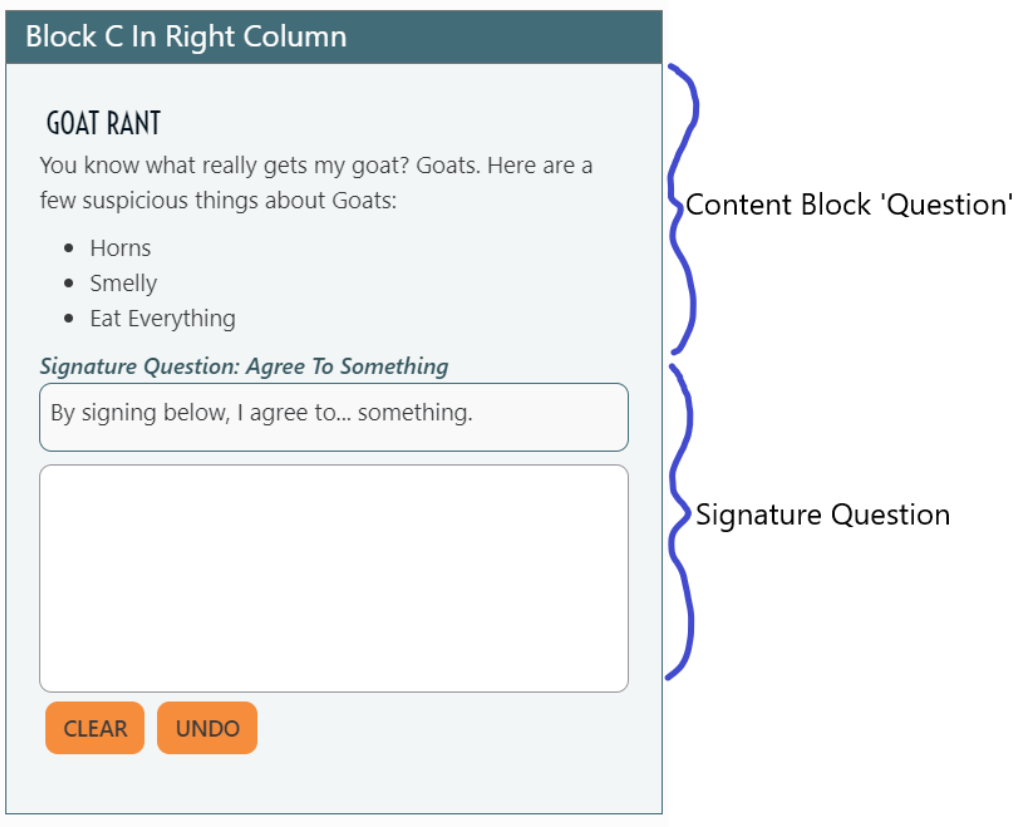
- Signature. This question produces a signature collection area and two labels above it— a short label for the question itself, and an "agreement text" that appears above the signature collection. The agreement text is a large box into which an admin can place formatted content.
- Content Block. This question is not a question at all, but rather inserts into the question area a large box into which an admin can place formatted content. This is ideal for lengthy instructions that pertain to a specific question or block of questions.
Part C: Create a Picklist (Picklist and Multiselect style Questions only)
Picklist and Multiselect Questions (in step B above) are questions that present the user with a set of pre-built choices. In PantrySoft, those choice-sets themselves are called Picklists, and they're crafted separately before they're wired to a specific question.
Despite the order of these instructions, it's easiest to build your Picklist first (using the following steps), then choose it in the Picklist field in the custom question itself
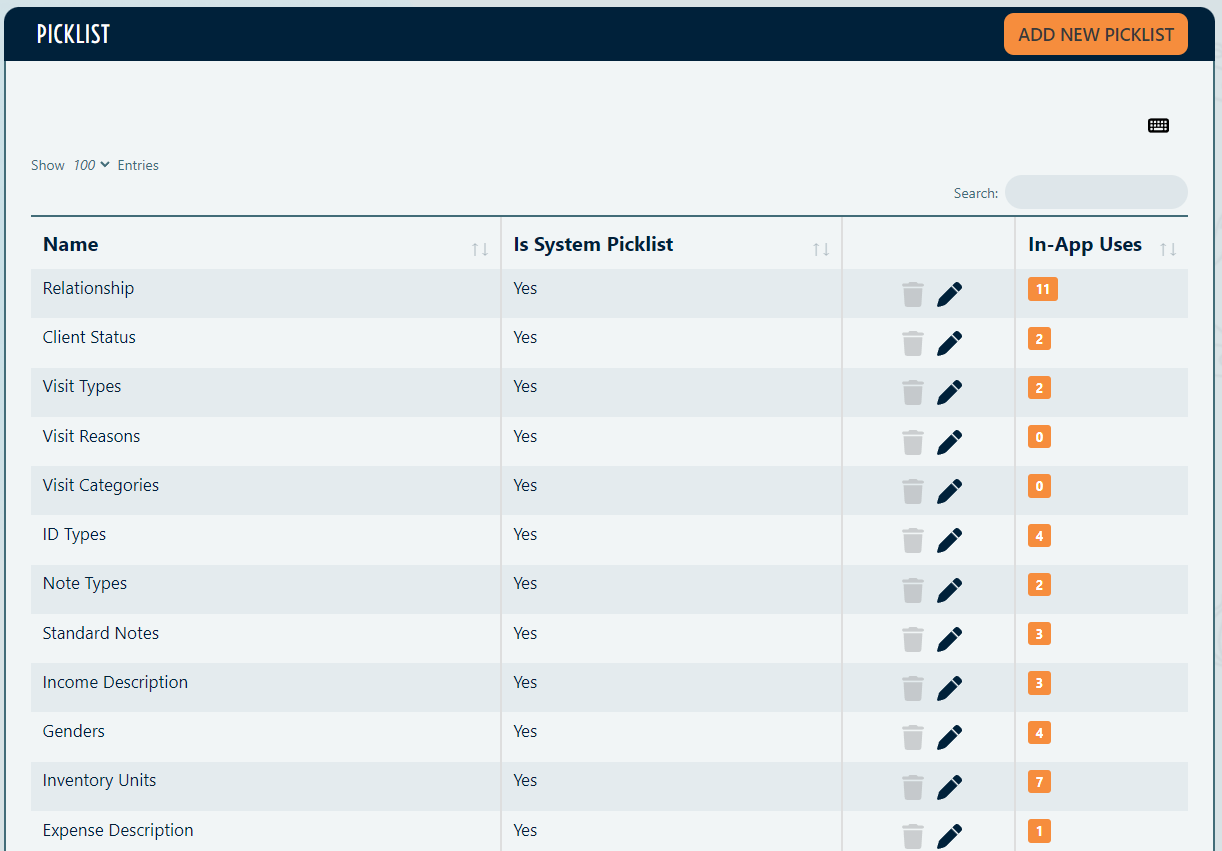
System Picklists? Picklists are also wired to other elements in PantrySoft. For instance, pantry programs are typically expressed in the app as different Visit Types, and the list of available Visit Types is itself a picklist. Picklists that PantrySoft depends on are labeled as "System Picklists" in the list, and you can ignore these for the purposes of crafting custom questions.
If you're designing a Picklist or Multiselect custom question, perform the following steps to create a new picklist:
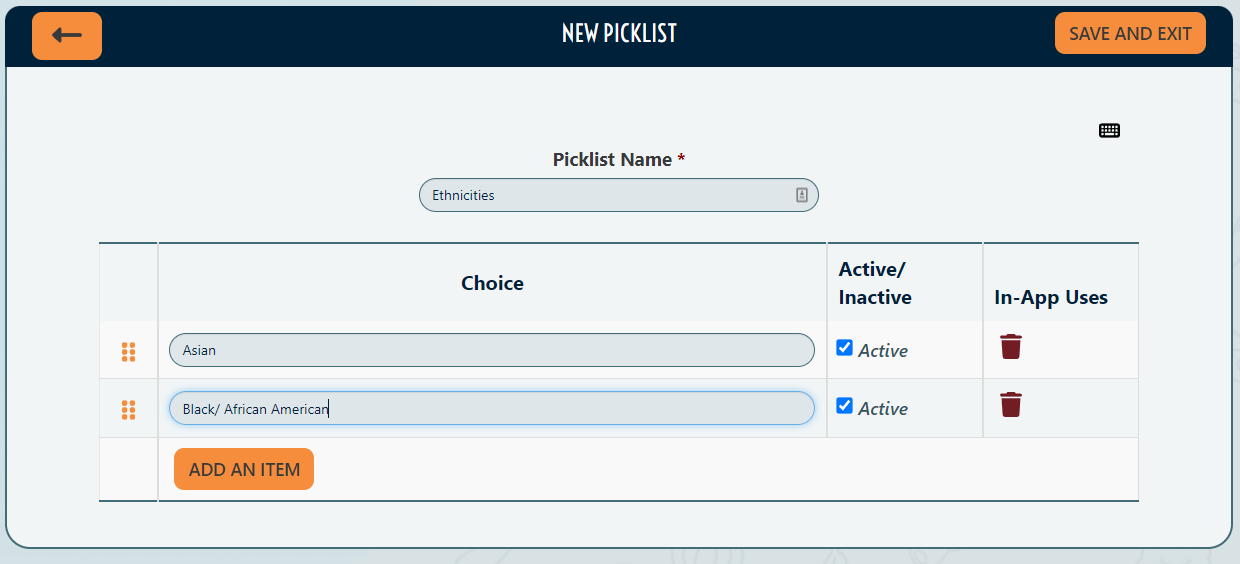
- Go to Picklists
Go to Setup -> Picklists. This will produce a table of all the picklists already in the system. Many of these are designated Base System, which means the questions themselves are pre-supplied and already utilized somewhere in the PantrySoft app. - Create a New Picklist
Click the Add New Picklist button. This will bring you to a Picklist Creation screen. - Name the Picklist Itself.
Enter a name for the new picklist that you will easily identify later (i.e., “Marital Status” rather than “Status”). Be as specific as you like, because this name is just how you find the collection when you're attaching it to a picklist or multi select question. - Add Options.
Click Add an Item for each option you’d like this picklist to manifest. Enter the choice as you’d like it to appear. - Save and Exit.
Click Save and Exit to return to the table of picklists. You're now ready to return to Step B and select this picklist for a Picklist or Multiselect question.
Ready to Go... Once your registration, demographic, and or visit questions are created, they can be included in various reports. To obtain these custom reports, please reach out to the PantrySoft Customer Success team by navigating to Support Tab and selecting Report Request.