Definition
In PantrySoft, a Household Member is a person attached to a household. A household in PantrySoft is called a Client. All Client records have a "primary" household member, after whom the Client record will be named on reports. Additional household members may be added, edited, moved, deleted, or deactivated to reflect the initial or changing membership of the household.
Automatically Generated Primary Household Member. When creating a brand new Client Record, the New Client screen will also gather data to create the primary household member. After saving this initial intake screen, the dashboard is loaded with the new Client record. This includes household information like address and status, but it also has a primary household member listed in Household Members widget in the center column. If there are additional household members, you would add them below the primary household member.
Creating a Household Member
Note: You have the option of adding a household member with detailed information by clicking on the plus button in the Household Member section of the client record:

This will allow you do enter detailed information about the additional household members as well as complete any custom demographic questions.

Alternatively, you can add placeholders to represent household members by clicking on the three-person icon.

If you need that setting enabled, go to Setup -> Household Members and change the following setting to Yes:
![]()
That will display three age categories (if you need those age ranges adjusted, please contact us at support@pantrysoft.com)

These will create nameless household members that appear like this:

A child will display as 1, an adult will display with the age at the bottom of the age range which, in this example if 19 and a senior will display as the age at the bottom of that age range.
There is also a setting that will allow you to add additional household members without ages:


Perform the following steps to add another household member to the client (household) record:
- Access the Client Record
Use the Staff Dashboard Search field to locate the Client record to which you will add a new household member. Load the Client into the dashboard. - Access the Household Member Screen
From the Staff Dashboard, click New Household Member on the Household Members widget. This will produce a New Household Member pop-up screen. - Enter Core Member Information
Fill out the required fields: Name (First and Last), Date of Birth, and Relationship are required by default.
Age not DOB: If you'd like to use age instead of date of birth for household members, go to Setup->Household Member Settings and set Use Age Instead of Date of Birth to Yes.

- Enter Answers to Custom Demographic Questions
Answer any custom Demographic questions for the new household member. The Demographic section is located beneath the core fields, but it will be invisible if no Demographic questions have been created and made active. - Record Your Entry
Click Save And Exit. This will close the window and reload the Staff Dashboard with the specifics for the new household member. Click Save And Add New if you wish to enter another household member.
Designating an alternative primary household member. There must always be a Primary household member on the Client record, and this person always has the "Self" relationship. You will notice that you cannot change the relationship of the current Primary. To designate a differed household member as the Primary, you must edit that other household member and change their relationship to "Self". After a confirmation alert, this will remove primary status from the current primary household member and confer it upon the new "Self" household member. The new Primary will rise to the top of the household member dashboard widget.
"Demographic" (Household Member) Questions. Any custom demographic (household member) questions set up by an admin with Report Setup privileges will appear on all New and Edit Household Member screens.
Demographic Questions are questions about relatively unchanging aspects of a specific household member. For instance, demographic questions might ask if a household member is signed up with another social service, or if they have any specific allergies that should be turned into a client-note (See Client Intake: Optional: Notes and Alerts). Of course, it also might inquire after traditionally "demographic" information like race, ethnicity, etc. Typically, demographic questions are included so that admins with report permissions can later aggregate the answers into various reports.
Editing a Household Member
Editing a household member is the same procedure as creating a new one (see above). To start editing a household member, click the pencil icon beside their name.

Moving a Household Member
Household members can easily be transferred to another household. For instance, in cases of divorce, children may see changes in their living arrangements but still require Pantry services. Remember that a household member can be temporarily deactivated and then moved later when they return (see Deleting or Deactivating Household Member section below).
Perform the following steps to move a household member to a different client (household) record:
- Verify the Household Member is Not the Primary*
Ensure the target is not the primary household member. - Edit the Household Member
Click the pencil icon beside the target’s name.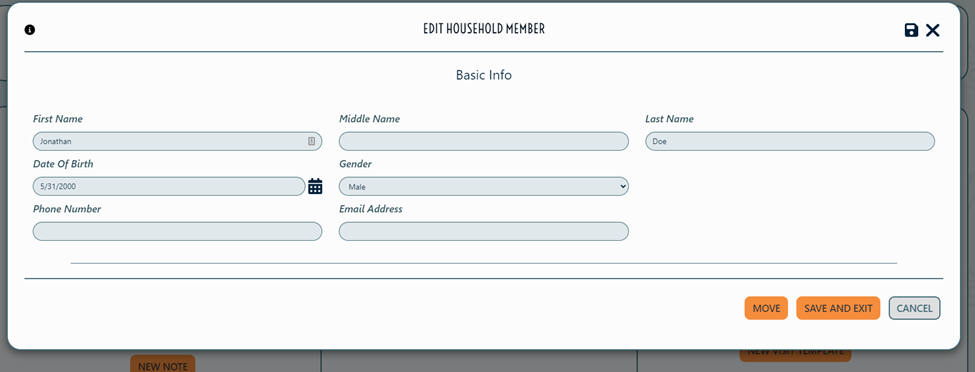
- Initialize the Move
Click "Move". A modified form of the Client Search will appear.
- Option 1: Add Moving Member to an Existing Household
If moving to a household that already exists, you can locate the new household by searching for the Primary Member's name. Select the new household from the results listed and click the "Move" button. You will receive a notification in the upper right corner of the screen that the move is complete. - Option 2: Add Moving Member to a New Household
If the household member is moving to a household not already in PantrySoft, click "New Client" to create a new household. When you're done, the moving Member is automatically attached. This will direct you through the standard steps of creating a new household.
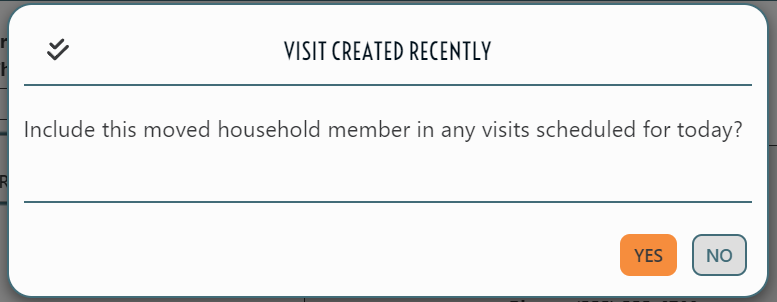
Note: If you move a household member on the same day that you've registered a visit with that household, the moving process will ask you if you'd like the transferring member to be included in the scheduled visit:
Moving Primary Household Member (multi-person household)
The Move button will be greyed out if you try to move the Primary household member. They must first be stripped of their "Primary" status.
- Choose a New Household Member to Designate as Primary
You can choose a pre-existing household member or add a new member. - Designate the New Primary
In the "Relationship" box, use the drop-down arrow and select "Self". This will designate this household member as the new Primary member.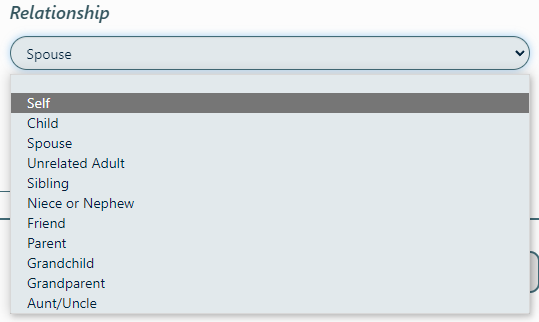
- Move the Former Primary Member
The Move button will now show in the former Primary member's record. Complete the "Move Household Member" steps listed above.
Moving Primary Household Member (single person household)
Unlike moving the Primary member in a multi-person household, you will not need to remove "Primary" status to move a single person household member. If there are no other members listed, the Move button will be available. Simply follow the "Move Household Member" steps above.
When you are in the process of moving the last remaining household member to another client record, you will see this message:

If you select Yes, the last remaining household member will be replaced by "Adult Placeholder" and that client record will automatically become inactive.
Member Deactivation
Deactivating a Member means that PantrySoft will cease to count them as participants in future household visits, but the record of the person itself is not expunged from the system.
Deactivating a household member instead of deleting them has a couple key benefits:
- A deactivated Member still appears on retrospective reports. For instance, PantrySoft will know that the member took part in past visits.
- A deactivated Member can still be found in searches, ensuring that in the future you don't create a redundant record of the person.
- A deactivated Member who returns to your pantry can be re-activated, for instance in the event they return later as the primary member of their own household.
Member Deletion
Deleting a household member means erasing their presence from the app entirely, which means removing them from reports spanning your pantry’s past. In most cases, this is not advised.
Note: Deleting a Primary household member. If you wish to actually delete a household member currently designated as Primary, you will need to confer the Primary status upon another member before they can be deleted. If the household member is the only member in the household, you must instead delete the entire client record, which will also automatically delete the primary household member.
Deleting or Deactivating a Household Member
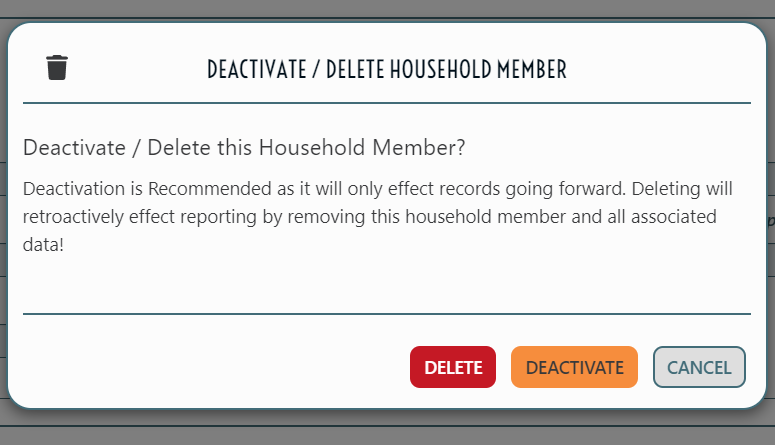
Perform the following steps to delete or deactivate a household member:
- Verify the Member isn't Primary
Ensure the target is not the primary household member. Determine this at a glance by verifying the Member's name isn't listed at the very top of the household member widget. - Edit the Member
Click the icon beside the target’s name. - Initialize the Delete / Disable
Click the Delete button. This will not immediately delete the household member. Instead, a pop-up will display, inviting you to instead deactivate the household member. - Option 1: Deactivate Member
If you wish to preserve the household member in reports of the past, click Deactivate. This will return you to the Staff Dashboard where the deactivated client will be greyed-out. A Re-Activation icon will now appear beside the deactivated Member. - Option 2: Delete Member
If you wish to remove the presence of the household member entirely, retroactively and otherwise, click and hold the second Delete.