
Definition
The Inventory Management screen allows you to bulk-transfer quantities of the items in your scheme through various Transaction Types.
Access this screen as a User with the Inventory role, go to (Inventory > Inventory Management)
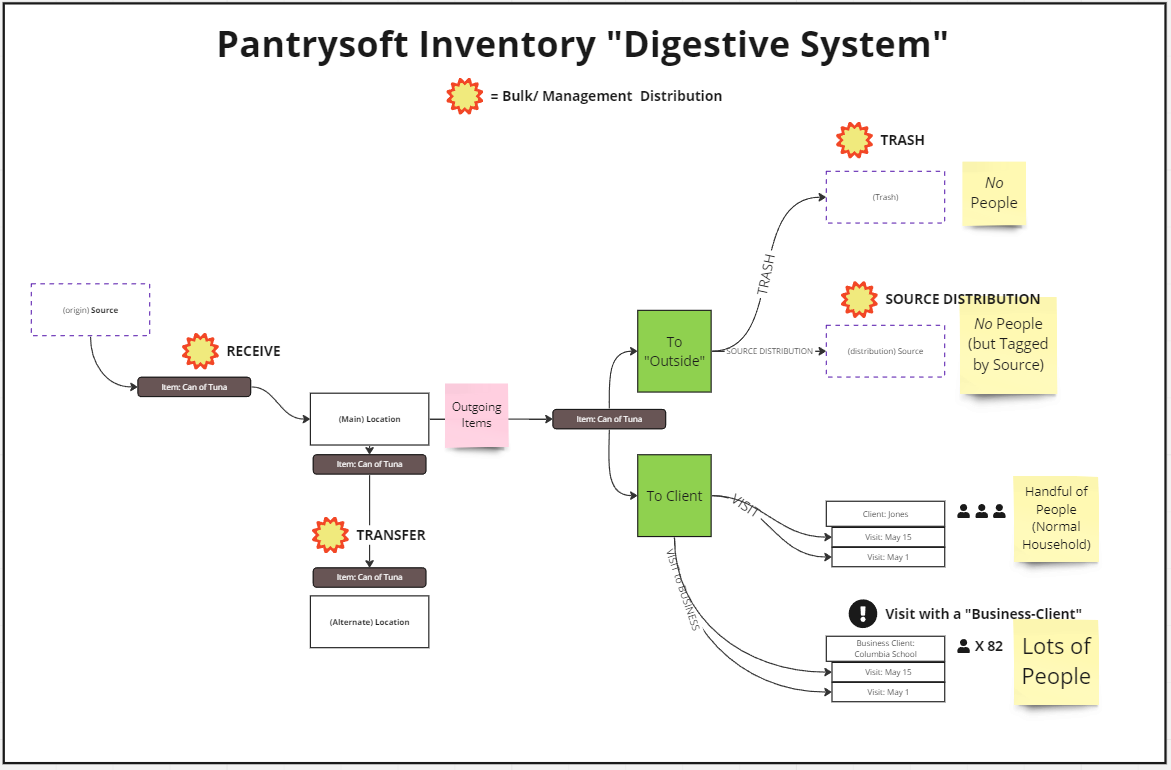
Transaction Types include:
- Receive. Receive quantities FROM a Source TO a Location
- (Source) Distribution. Export quantities FROM a Location TO a Source (A destination that is not necessarily attached to a household nor a Client Record)
- (Location) Transfer. Move quantities FROM one Location TO another Location (requires multiple Locations)
- Trash. Move quantities FROM a Location to a destination that should not be reported as a service/distribution (outside of your pantry, transaction marked as Trash)
- Adjust. Perform a retail-style "inventory," directly adjusting the on-hand quantities of a single Location
Location? In PantrySoft, it's important to know that a Location is first and foremost a bucket of items. Outside of the Management screen, it also serves as a tag or filter for Visits. But for the purposes here, think of it as an item-quantity container.
Basic Usage (All Modes)
The Management screen (Inventory > Inventory Management) allows an admin to perform bulk movements and adjustments of inventory called Transactions. You're choosing a FROM on the left column and a TO on the right, entering quantities in the middle column, and then clicking the Move Quantities button to perform the movement.
Note the following basic steps common to all actions you'll perform from the Inventory Management screen:
Choose a Transaction Type. To perform any of the Transaction types, you'll select the Transaction Type at the top. Your installation settings dictate which of the 5 Transaction Types are available to you. Note: If you would like to access a transaction type that is not yet available in your installation, please reach out to the PantrySOFT support team.
Review Transaction Time. Adjust the (Transaction) Time field as needed to back- or post-date an item movement. Note: The time field is only for record keeping purposes, as transactions instantly impact inventory upon completion. The system won't 'wait' to conduct a transfer if you schedule it in the future.
Item Filtering/ Selecting. You can filter the list of items on this screen by choosing a specific Item Type in the Item Type field. You can also use a bar-code scanner to auto-increase the movement-quantity of a single item (by default this will increment the item's movement quantity by 1, but you can also type a larger number into the quantity field before scanning to add more at a time).
Choose a FROM and a TO. In some modes you'll have a choice of FROM (Source Location), TO (Recipient Location), or sometimes both.
- In the Adjustment mode, you'll simply choose a target Location for conducting retail-style "inventories"; see below.
- In the Distribution mode, you'll choose an Inventory Source as a destination. We recommend you label those Sources with the appropriate Source Type.
Add and Move Quantities per Item. For all modes, you'll enter the quantities you wish to move before clicking the orange "Transfer/Adjust/Receive/Distribute/Trash Inventory" Button in the top righthand corner.
Review and Edit your Transactions. The movements you make on this screen are immediately logged in the form of a Transaction, which you can see by going to Inventory >Transactions. There you can make adjustments to the transaction you just created, and inventory will automatically adjust. You can also see Transactions on Inventory Reports in the form of "Movements" (Reporting > Inventory Reports).
Specific Modes - Step by Step
Receive Items


A Receive is a movement of Items (quantified back-end items) from a Source to a Location. It adds quantities to the Location's Current Inventory (verify this at Inventory > Available Inventory).
Use Case: Managing incoming inventory through Receives allows organizations to track inventory by the specific donors and donor types.
Follow these steps to receive items from a Source to a Location:
- Select "Receive" Transaction Type
Select Receive for Transaction Type.
- Select FROM Inventory Source
Select the Source (vendor) from the Inventory Sources field on the left. - Select TO Recipient Location
Select the Location from the Recipient Location field on the right. This Location's inventory will display on the right in the table below. This is the Location 'receiving' the items. - Add Quantities
For each item you're trying to transfer from one Location to another, locate the item's row and add the quantity you want to transfer at the bottom section of the screen. - Receive the Inventory
Click Receive Inventory button at the top right to perform the Inventory Receive. You will see a notification confirming the transaction, and the quantities will update on the table.
Source Distribution


A (Source) Distribution is a movement of Items (quantified back-end items) from a Source to a Location outside of PantrySOFT that is not necessarily connected to a Household or a Client Record.
Use Case: A great options for the need to report on inventory distributed in an anonymous manner.
Follow these steps to Distribution items from a Source to a Location:
- Select "Distribution" Transaction Type
Select Distribution for Transaction Type. - Select FROM Source Location
Select the Location from the Source Location field on the left. That location's inventory will display on the left in the table below. This is the Location 'distributing' the items. - Select TO Inventory Source
Select the Source from the Recipient Location field on the right (or create a new one with the "+" button). We recommend labeling these with a Source Type that designates them as Distribution Sources. See PantrySOFT Inventory Sources for more information.
Note: technically speaking, the Source is just a way to track where the items went in the real world; while this "distribution" transaction will be attached to your Source on reports... as far as PantrySoft is concerned, the item quantities you distribute in this way are hereafter no longer meaningfully tracked as they would be in a Transfer to another Location. - Add Quantities
For each item you're trying to Distribute from one Location to a Distribution Source, locate or search for the item's row and add the quantity.
- Distribute the Inventory
Click the Distribute Inventory button at the top right to perform the Inventory Transfer. You will see a notification confirming the transaction, and the quantities will update on the table.
(Location) Transfers


A Transfer is a movement of Items (quantified back-end items) from one PantrySOFT Location to another. It alters the Current Inventory, subtracting an item from one location and adding that same quantity to another.
Follow these steps to transfer items from one location to another.
- Select "Transfer" Transaction Type.
Select Transfer for Transaction Type. - Select Source Location
Select the Location from the Source Location field on the left. That location's inventory will display on the left in the table below. - Select Recipient Location
Select the location from the Recipient Location field on the right. This location's inventory will display on the right in the table below. - Add Transfer Quantities
For each item you're trying to transfer from one Location to another, locate the item's row and add the quantity you want to transfer. - Transfer the Inventory
Click Transfer Inventory to perform the Inventory Transfer. You will see a notification confirming the transaction, and the quantities will update on the table.
Trashes


Trash movements essentially remove items from a certain location without tracking where they went. These transactions are flagged as "Trash" type, but tracking doesn't extend beyond that. This is particularly useful for produce and other expiring items that should no longer reflect as available in the system.
Follow these steps to remove quantities of (trash) items from your inventory:
- Choose Trash Mode
Click the Transfer Type drop-down menu and select Trash. A trash can icon will appear in the table below. - Optionally, Filter the Report by Item Type
Filter your inventory by Item Type by selecting the desired Item Type from the corresponding drop-down menu. - Transaction Time
Optionally, adjust the Transaction Time. You can, for example, log a prior disposal.
Note: The time field is only for record keeping purposes as item transfers are conducted instantly upon completion. The system won't 'wait' to conduct a transfer if you schedule it in the future.
- Choose a Source Location
In the FROM section on the left, find the Location that has the quantities you wish to trash. That location's inventory will display on the left in the table below. - Choose Quantities
For each item you wish to trash, locate it manually, filter by item type, or search for it. Input the number of units you are trashing. - Trash the Inventory
Click Trash Inventory to trash the indicated item(s). You will see a notification confirming the transaction and the quantities will update on the table.
Note: This transaction will appear on the top of the table in the Inventory Transactions screen (Inventory >Transactions) as a 'Trash' type. These entries can be edited or even deleted from the Transactions screen after you've made them.
Adjustments (Quantity Corrections and Updates)
Adjustment movements allow you to directly dictate to PantrySoft the actual on-hand quantities for a single Location. This is similar to the process larger retail stores perform when they conduct "inventory audits" to adjust their electronic totals to account for shrinkage and waste.
From and To? The Adjustment mode differs from the others, as there is no "FROM and TO" model; you're simply telling PantrySoft what's actually on your shelves at a given Location.
Behind the Scenes? Under the hood, an Adjustment is similar to a Receive transaction, except it allows for negative numbers (quantity subtractions) and isn't associated with a Source. The quantities are either removed or added, but these "movements" aren't associated with another entity (like a Receive would be associated with a Source).
Order of Operations: Ensure that you are editing inventory on Visit Records prior to making inventory adjustments, if applicable.
Follow these steps to directly adjust on-hand quantities of items from a single Location:
- Choose Adjustment Mode
Click the Transfer Type drop-down menu and select Adjustment. - Transaction Time
Optionally, adjust the Transaction Time.
Note: The time field is only for record keeping purposes as item adjustments are conducted instantly upon completion. The system won't 'wait' to conduct an adjustment if you schedule it in the future.
- Choose a Location
Choose the Location that has the quantities you wish to trash. That location's inventory will display on the right in the table below. - Select New Quantities
For each item you wish to correct, locate its row under the Actual Inventory column. Use the arrows or type a number directly in the Quantity field to specify how much of the item is actually on-hand. - Adjust Quantities
Click Adjust Quantities to change on-hand quantities to the ones you entered. You will see a notification popup confirming the transaction and the quantities will update on the table.
Note: This transaction will appear on the top of the table in the Inventory Transactions screen (Inventory >Transactions) as an 'Adjustment' type. These entries can be edited or even deleted from the Transactions screen after you've made them.