
Note: If you have not set up any inventory Sources yet, you will be unable to process any Inventory Receives. See Inventory Sources to first complete that setup.
Once one source is set up, you can add additional sources either from the Inventory Sources screen, or by clicking the orange “+” next to the sources field in the inventory receives screen.
You can also compete an inventory receive on the Management screen.
Definition
An Inventory Receive is the record of incoming inventory associated with an Inventory Source. At minimum, an Inventory Receive contains the time and location of an incoming item transaction.
Creating a New Receive
Follow these steps to set up a new Inventory Receive and record the items transferred:
NOTE: Granular vs. Bulk Items: Pantries set up inventory tracking in different ways; specifically, some pantries use a few gross 'items' like "USDA Food Pounds" while others (especially those using the Client Portal) might itemize their received food in detail (e.g., "Canned Tuna").
A bulk approach might look like this on the inventory table (see step 4):The screenshots in this document reflect the granular (itemized) approach but bear in mind you can set up inventory items at any size-scope you like.

- Access Inventory Receive Screen
Navigate to Inventory->Receives from the top toolbar.

- Start a New Receive Record
Click New Receive. - Confirm Required Fields
If you're not logging incoming inventory, skip to Step 5 (Save and Exit) after verifying required fields. Those fields are detailed as follows:

- Inventory Source. To change to source from which you are receiving your items, click the Inventory Source drop-down menu and select the inventory's origin. If you do not see your source in this drop-down menu, you will have to first set up their account in the Inventory Sources screen.
- Location. To change the location receiving the items, click on the Location drop-down menu.
Note: This is only applicable if you manage multiple physical locations. - Receive Time. To change the date and time of receiving, click on the calendar icon next the Receive Time field. The default is the current time and date. This functionality allows logging of previous entries that may have been missed. To change the day, click on the desired date in the drop-down calendar. Click the arrows at the top to adjust the month. To change the receiving time, click and drag the sliders next to Hour and Minute. Click Done to save the new entry.

- Inventory Source. To change to source from which you are receiving your items, click the Inventory Source drop-down menu and select the inventory's origin. If you do not see your source in this drop-down menu, you will have to first set up their account in the Inventory Sources screen.
- Log Inventory Receive Items
Inside the Item Entry area (shown below), select an Item from the Select Item to Add field. This will load the default values for this item into the Item Entry area. Verify or change those fields as required and click Add Item to add the item (as you've now configured it) to the Receive Item table below.
The Item fields are as follows:

- Item. Select an Inventory Item to be received.
Once you have selected an Item in the menu, the other fields will populate based on the Inventory Item's default properties set up in the Inventory Item screen. Click the filter icon next to the Item drop-down menu to open a new Type Filter to search by Item Type.
For example, if you set up the Inventory Item 'Beef' with a unit weight of 1 and a unit value of 5, selecting 'Beef' would add a Beef item. It would supply it with a starting quantity of 1. It would then also add a Unit Weight of 1, a Total Weight of 1, a Unit Value of 4 and a Total Value of 5. - Quantity. Select the quantity received.
(Changing the quantity of an item will auto-calculate the Total Value and Total Weight fields. Total weight will change to Unit Weight * Quantity, and Total Value will change to Unit Value * Quantity.) - Unit Value. Change or verify the default Unit Value, which initially appears according to the value entered in the Inventory Item.
(Alternatively, allow the system to auto-calculate Unit Value field after manually changing the Total Value field instead. Together with your choice of quantity, entering Total Value will automatically calculate Unit Value.) - Unit Weight. Change or verify the default Unit Weight, which initially appears according to the value entered in the Inventory Item.
(Alternatively, allow the system to auto-calculate Unit Weight field in favor of manually changing the Total Weight field instead. Together with your choice of quantity, entering Total Weight will automatically calculate Unit Weight.) - Total Value. Optionally change the item's Total Value and observe the Unit Value recalculating to reconcile with the quantity you've chosen.
- Total Weight. Optionally change the item's Total Weight and observe the Unit Value recalculating to reconcile with the quantity you've chosen.
- Comments. Optionally add any notes pertinent to receiving this item in the Comments field.
- Delete. Click Delete to remove an item from the table.
- Item. Select an Inventory Item to be received.
- Record Your Receive.
Click Save And Exit. This will save the record and return you to the Inventory Receives page. If the date of your new receive is more recent than any of the others, it will be visible at the top of the table below.
Note: Clicking the "Back" button (<-) instead abandons the information on this screen and returns you to the Inventory Receives page.
Editing and Deleting an Inventory Receive
Following these steps to locate, edit, and delete an Inventory Receive.
- Access the Receive Screen
From the menu, go to Inventory->Receives.

- Choose a Receive to Edit or Delete
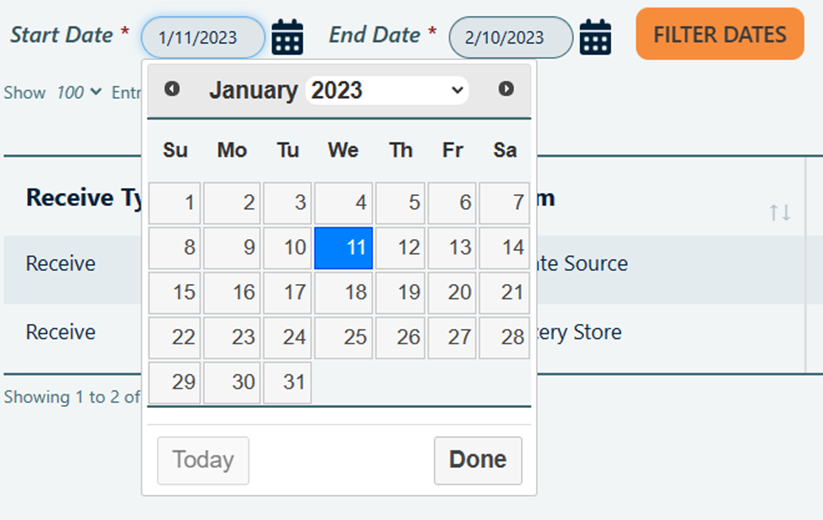
There are several tools to help locate a particular Receive:- Date Range: Adjust the search table by changing the Start Date and End Date in the fields on the top left of this page. Click the calendar icon next to each to load a date editor. Once you have selected the desired date range, click Filter to update the table.
Note: By default, the search filter is set to display records from the past 30 days.
- Show 'x' Entries. Click the drop-down entries menu on the left above the table, and change the value to limit the number of rows displayed on the page.
- Search Field. Locate an item by typing the item name into the Search field above the table on the right.
- Column Sorting. Click the up/down arrow at the top of a column to sort the table by that column (ascending or descending).
- Previous/Next Page. Click the Previous or Next buttons at the bottom right of the table to switch to a different page. Alternatively, click a page number to jump directly to that page.
- Date Range: Adjust the search table by changing the Start Date and End Date in the fields on the top left of this page. Click the calendar icon next to each to load a date editor. Once you have selected the desired date range, click Filter to update the table.
- To Edit a Receive
To edit an Inventory Receive, click the Edit button on the Receives row. This will load an Edit Inventory Receive page, which is functionally the same as a New Inventory Receive. - To Delete a Receive
To delete an Inventory Receive, click the Delete button on the Receives row. Confirm the deletion in the pop-up window by hold-clicking the red Delete button. Click Cancel to return to the previous screen.
WARNING: There is no "undo" for this step other than manually recreating the deleted Receive.