Inventory with Choice-Based system
Choices can be used to assign custom "choice values" to inventory items. The number of choices a client is allowed can be limited at the item type level, allowing more precision than a credit-based system.
When to Use a Choice-Based Inventory System
Client-choice pantries that allow guests to pre-order items through the client portal will benefit the most from this system. This feature is great for pantries that want to set limits for categories of items (ex. Proteins), but not every item in the category is equal in relative value (ex. 1 lb. of chicken is higher value than 1 can of beans). Pantries following state or federal nutritional guidelines (like New York State's HPNAP) will find this feature essential for managing choices or points.
How Choices Work on the Client Portal
Pantries can limit the number of choices clients are allowed to take in each category (In PantrySoft a category is called an "Item Type"). Each item in the category can have a custom Choice Value, assigned by the pantry admin.
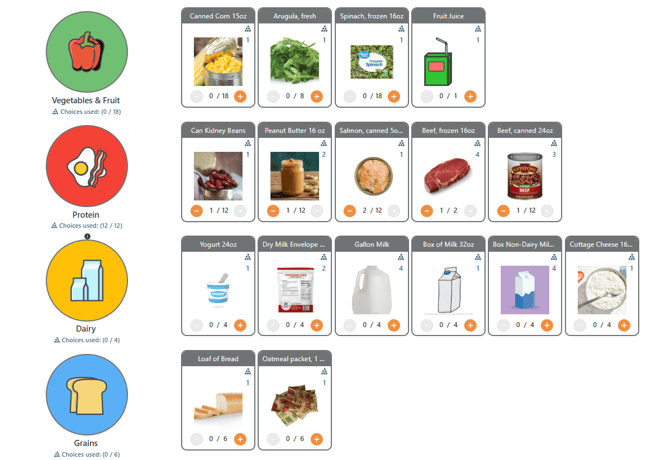
Pictured below: The PantrySoft Client Portal demonstrating a choice-based inventory scheme. Each row is an Item Type, and each card in the row is a specific Item in that Item Type.
What Clients Will See
Pantry clients using PantrySoft's online portal to order items will see Choice Limits and Choice Value while they shop:
 |
 |
|
| The Choice Limit is represented by a fraction under the Item Type picture. | The Choice Value for an item is found on the upper right corner of the item card. |
As clients add items to their cart, PantrySoft automatically tracks how many choices they've used.
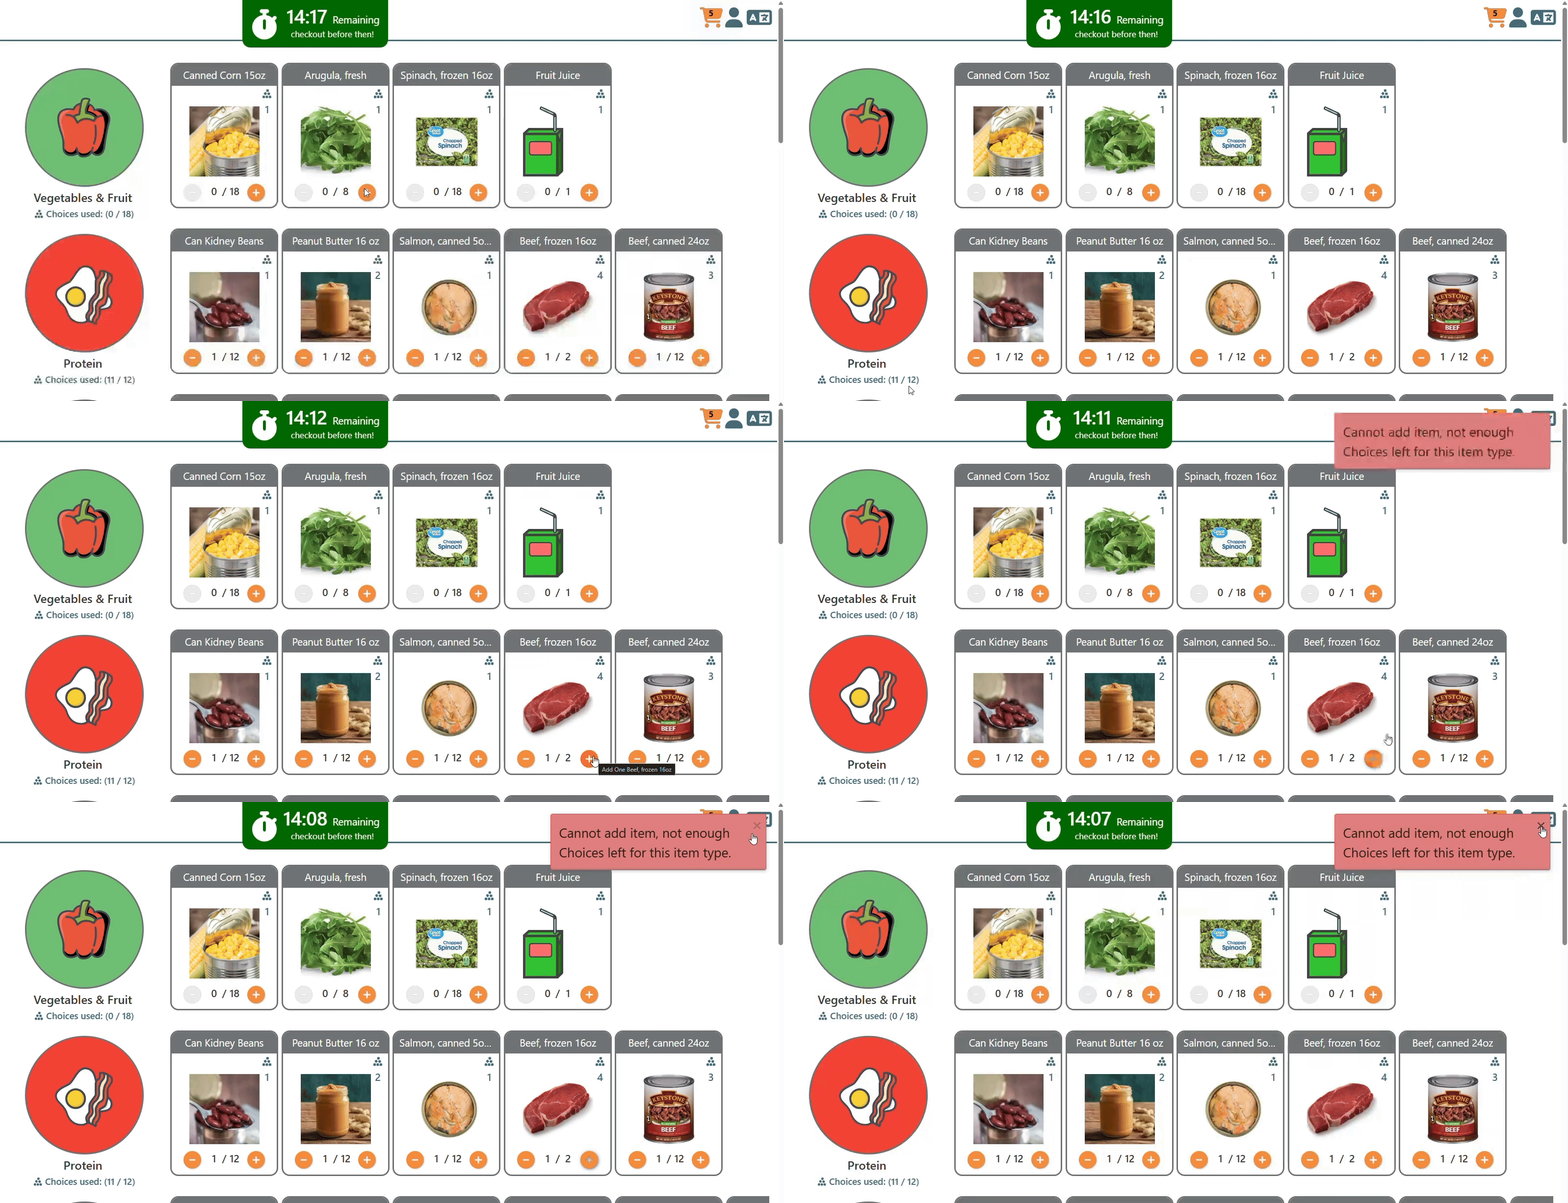
In the example below, watch as items are added or subtracted from the cart and the Choices Used fraction updates in real time.

Maxing out the Choice Limit
Once a client maxes out the Choice Limit for the Item Type, they cannot add more items from that category to their cart. They can continue to add items from another Item Type that has not reached it's Choice Limit.
In the example below, watch as a can of kidney beans (worth 1 choice) is added to the client's cart. With 12 out of 12 Protein choices used, the orange 'plus' buttons grey out and more Protein items cannot be added. Instead, this client continues adding items from the Vegetables & Fruit category.
.gif?width=670&height=346&name=Recording%202025-03-14%20102612%20maxing%20out%20(1).gif)
If a client selects an item that would exceed the Choice Limits for an Item Type, a red warning flag will appear on the screen and the item will not be added to the client's cart.
In the example below, watch as the client goes to add another frozen beef item (worth 4 choices) when they've already used 11 out of 12 Protein choices. The red warning "Cannot add item, not enough Choices left for this item type" appears in the right hand corner of the screen.

Setting up Choices in PantrySoft
Step 1: Ask to enable choices on your account
Reach out to support@pantrysoft.com or submit a support request to ask our team to turn this feature on in your account.
Please note: Choices and credits should not both be enabled at the same time.
Step 2: Use Household Rules to create tiers based on household size
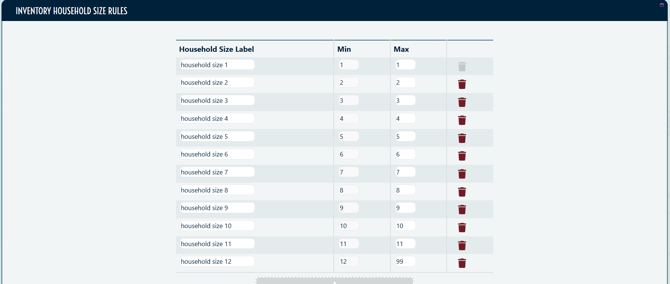
Household Rules are the basis for establishing dynamic choice limits that change based on the number of people in a client's household. Out of the box, every organization using PantrySoft has a single Household Rule tier: Default = 1-99 household members.
Navigate to the Household Rules option from the Inventory menu to create additional tiers as needed.
In the example below, there is a tier for each household size up to 12+ members.

Step 3: Create an Item Type & set Choice Limits based on household size
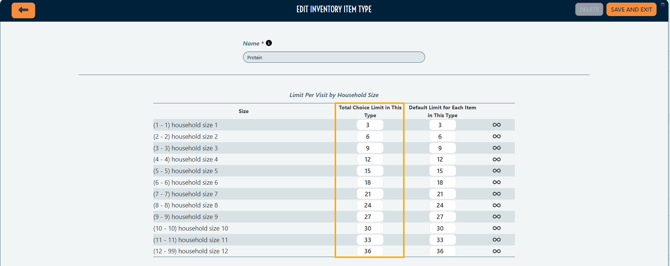
Item Types are categories of inventory items. With a choice-based inventory system, admins can limit the total number of choices allowed to clients in that category, based on household size.
Navigate to the Item Types option from the Inventory menu to create a new Item Type, or edit an existing Item Type. On each Item Type, set Choice Limits for each household tier.
In the example below, the "Protein" Item Type allows 3 choices for a household of 1, but allows 12 choices for a household of 4.

Remember to hit 'Save and Exit' to save adjustments made to the Item Type.
Tip: Item Limits are still active when choices are enabled. From the Item Type screen, you can also set a default Item Limit for new items created in this category. This is the default maximum units of an item a client would be allowed to order. These default Item Limits can be overridden later.

Step 4: Create an item & set choice value
When choices are first enabled, all items will default to a Choice Value of 1.
Navigate to the Items option from the Inventory menu to create a new inventory item, or edit an existing item. On the item record, enter a whole number into the Choice Value field.
In the example below, the canned beef item has been assigned a Choice Value of 3.

Remember to hit 'Save and Exit' to save adjustments made to the item. Once items have been created and assigned a Choice Value, admins are ready to receive these items into their Available Inventory to make them available for clients to order. (See: Inventory Receives article for more information)
Tip: Item Limits for a specific item can also be customized, or overridden, from this screen. If you want to adjust the maximum units a client will be allowed to order of this item, click the + button in the Override column to manually adjust.

Step 5 (optional): Review item choice value from the Inventory Items screen
Admins can see the Choice Value of all items from the Inventory Items screen.
Navigate to the Items options on the Inventory menu. Use the drop-down filters at the top of the top of the page to filter the items you see by Item Type, Status, or where the item is visible ('Shows on' store, kiosk, or dashboard). Look at the Choice Value column to review an item's current choice value at a glance.
In the example below, there are five items in the "Protein" Item Type, with varying choice values.

Summary
Managing inventory limits with choices gives pantries the flexibility to assign custom choice values to each item. This empowers pantry clients to choose between a variety of foods with different relative values. Choice Limits can be set at the Item Type level, allowing pantry admin to get specific about what clients are allowed from each category.
Reach out to support@pantrysoft.com to learn more about using this feature in your account!

