
Definition
A Map Overlay is a custom map layer created using Google Maps that can be used in PantrySoft to provide a visual representation of geographical boundaries. Map overlays can be used to demarcate delivery routes or provide a quick reference as to whether a potential client resides in an eligible location for service.
Note: Implementation of this feature does require a Google account. PantrySoft is not associated with or endorsed by Google. Google may change the way its Maps application works at any time, so this article will be linked to Google documentation. PantrySoft is not responsible for the content of Google.com articles.
Creating a Map Overlay
Follow these steps to create a custom map layer in Google Maps.
- Access Google Maps
Navigate to https://www.google.com/maps/d/u/0/. If you are not logged into your Google account, the website will prompt you to log in. This is the direct link to Google's "My Maps" website where you'll be creating the custom map that will act as your overlay. - Create a New Map
Click Create a New Map in the top left corner. This Google article covers how to create a new map in detail: https://support.google.com/mymaps/answer/3024454?hl=en&ref_topic=3024924. Optionally, name your map. - Locate Your Area
Navigate to the geographical location where you want to draw your map overlay. You can use Google's search to quickly locate your municipality. - Select the Draw Tool
From the toolbar at the top, click the "draw a line" tool located on the top toolbar.

- Draw A Shape Around Your Boundaries
Click on the map to start drawing the first line of your map's overall polygon. Detailed instructions on how to draw shapes can be found here: https://support.google.com/mymaps/answer/3433053?hl=en&ref_topic=3024924. Here are some quick tips from the PantrySoft staff:
- Create a Simple Shape. Polygons are the intended result--they are what causes a tinted overlay to appear on the map. To create a polygon, you have to draw all the points of the shape in one go, connecting the final point to the first point. If you stop creating your shape at any point before it is joined at the end, you will be left with only a line. To help prevent this, keep the boundaries simple. You can always adjust points on the overlay later once the initial shape has been established; just click and drag any point on the polygon.
- Use the Arrow Keys. Use the arrow keys on the keyboard to help navigate around the map while drawing your lines. The mouse does not function the same when drawing a line as when simply viewing a map. This is especially helpful if you are zoomed in to find street boundaries and need to move around the map without disrupting your lines.
- Look for the Circles. The little circles indicate each point on the map polygon. Notice the mouse changes when you hover over them. This helps when you're trying to find the original point that started your map polygon, or you're editing the boundaries and need to find an existing point.
- Create a Simple Shape. Polygons are the intended result--they are what causes a tinted overlay to appear on the map. To create a polygon, you have to draw all the points of the shape in one go, connecting the final point to the first point. If you stop creating your shape at any point before it is joined at the end, you will be left with only a line. To help prevent this, keep the boundaries simple. You can always adjust points on the overlay later once the initial shape has been established; just click and drag any point on the polygon.
- Style Your Map
Double-click on the polygon to bring up a window with some options for your new shape. Click the paint can icon to choose a color for your overlay. Adjust the transparency so that the color is visible, but does not overly obscure the map. Once you are finished styling your shape, click the 'x' in the corner to close the window. Your map is complete. Google automatically saves the map to your account after every change.


Integrating a Map Overlay into PantrySoft
Follow these steps to integrate the previously created map into PantrySoft.
- Access Quick Sharing
Once you have completed your edits to your custom map, click the Share button on the map panel on the top left of the screen.
- Enable Sharing
On the next window, click the slider Anyone with this link can view. The slider will turn blue once the option is enabled.
- Copy the Link
Copy the URL link displayed on the sharing window. Either click directly on the field to select the text, or click the copy icon to the right of the link.
- Send the Link to PantrySoft
Open an email and send us the copied link to support@pantrysoft.com. Let us you want this map overlay added to your PantrySoft account. We'll take it from there.
Note: The map overlay will only be active as long as your Google.com account is active. It is shared over the internet from Google's servers. Do not delete your account if you intend to use this feature.
Using the Map Overlay
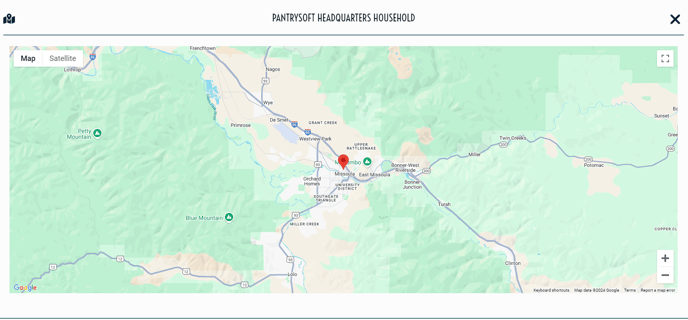
This section shows how to access and interpret the map overlay.To see your new map overlay, first open client record. Click the map icon in the address widget located on the left side of the Staff Dashboard. The created polygon is now displayed on the map, establishing a visual representation of your service area. Reference the red pin icon to see the client's address in relation to your boundaries.


Note: This map overlay is simply a visual representation of geographical boundaries. It does not restrict registration or sort users by address. It does provide a quick reference to see if a client lives in a certain area.
For example, you might use the map overlay to help assign clients to certain driver routes. Your staff could reference the map, see which area the client lives in, and then assign the visit template to that route.
Another example is you might use the map to see which clients are eligible to be served if you restrict access by city limits. Staff could cross-reference the map to quickly gauge whether a client resides within their service area.