
Steps to Get Started:
- Give Users Access to the Volunteer Account.
- Set up Picklists for Volunteer Activity.
- Set up Volunteer Registration/Application.
- Determine New Volunteer Management Workflow.
- Set Up Shift Self-Scheduling.
- Record Volunteer Activity.
- Leverage Reporting and Communication Tools.
Step one: Give Users Access to the Volunteer Account
NOTE: All User Management must be done in the non-volunteer account. See steps 4 and 5 below on how a user can move back and forth between accounts.
- Click on your name in the upper right corner > User Management
- Use the edit pencil icon to open the User Forms of those who need volunteer account access.
- Check the box to enable Volunteer Account Access.
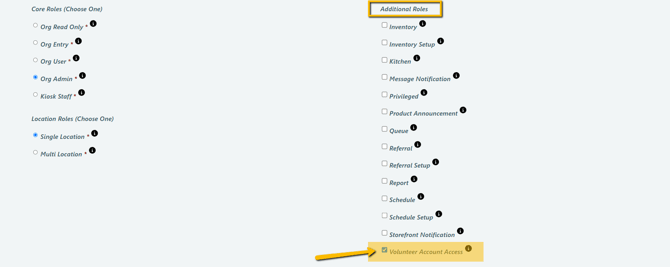
- Once saved, the user will see a Volunteer toggle Icon in their dashboard.
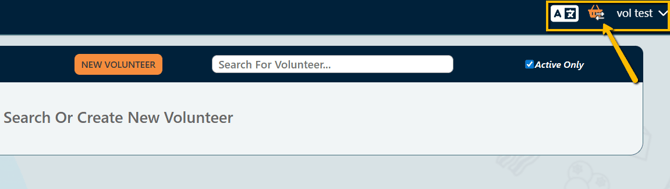
- To navigate between Accounts, simply click the Volunteer Toggle Icon and confirm the switch.
Step two: Set up Picklists for Volunteer Activity
Shift Types
Note: Shifts exist in the PantrySoft Volunteer platform the same way that Visits do in the core PantrySoft platform. A shift is the record of a volunteer’s activity.
- Navigate Setup > Picklists
- Locate the Picklist titled “Shift Types” and use the edit pencil icon to open that picklist.
- To add to this list, select “Add An Item”

- To remove an item from this list, Uncheck the “Active” checkbox.

A note on specificity:
Users can determine how specific these lists need to be. Some orgs will have one Shift Type - something like “Volunteer Shift” - and that is all Volunteers sign up for on the Volunteer Portal.
Others, however, might want to provide more specific options to volunteers self-scheduling on the Portal, or track the different volunteer Shift Types at this level.
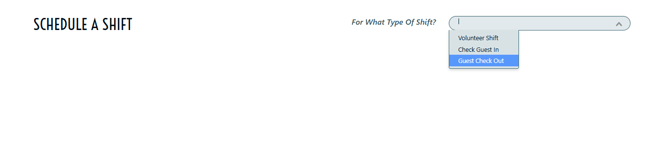
Below is a screenshot of the Shift Type options of the picklist above that volunteers would see when Self-Scheduling on the Volunteer Portal:
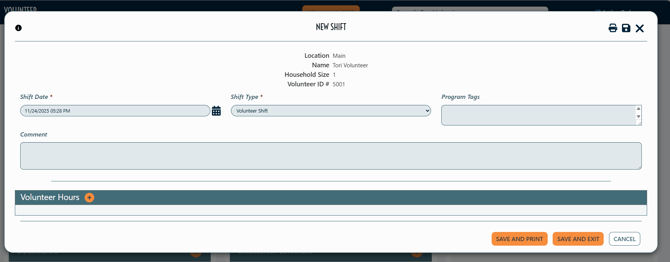
If an organization does not need to track specific volunteer tasks and hours, admins can simply record a Volunteer Shift/Type without additional data by selecting “Save and Exit”:
However, if Users would like to add volunteer hours and added specificity, admins may decide to leverage Volunteer Task Types.
Volunteer Task Types
Note: Volunteer Task Types exist in the PantrySoft Volunteer platform in a very similar way to Inventory in the core PantrySoft platform. A Task Type allows admins to track volunteer activity in a more specific manner.
- Navigate Setup > Picklists
- Locate the Picklist titled “Volunteer Task Types” and use the edit pencil icon to open that picklist.
- To add to this list, select “Add An Item”
- To remove an item from this list, Uncheck the “Active” checkbox.
- Once satisfied with the list, be sure to “Save and Exit”.
A note on specificity: Users can determine the scheme and specificity for this Volunteer Task Type picklist. If admins only need to track Volunteer hours associated with a shift type, they may choose to have a single Volunteer Task Type - such as “Volunteer”.
If admins need to track volunteer activity and hours with more specificity, the Volunteer Task Type picklist will need more detailed options.
Below is a screenshot of how Volunteer Task Types are documented on a Shift Record:
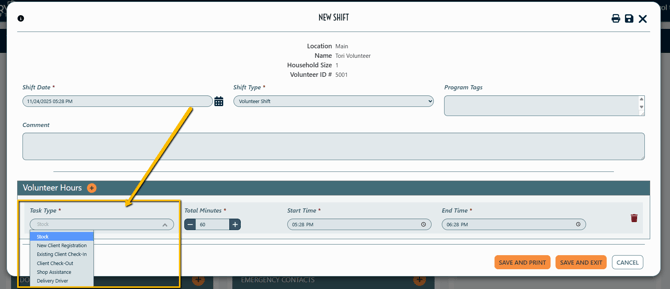
Set Task Type & Time defaults on this screen:
Path: Setup > Visit Settings:
- Locate the setting Default Task Type for Volunteer Shifts
- type the exact Task Name (from the picklist) in that string field.
- Below it, Default Amount of Time for Volunteer Tasks
- Indicate the default number of minutes for Tasks
Note: both of these defaults can be adjusted on the Shift Record in the moment of data entry.
Step three: Set up Volunteer Registration/Application
Note: Volunteers/Volunteer Records exist in the PantrySoft Volunteer platform exactly as Clients/Client Records in the core PantrySoft platform.
Volunteer registration/application functions the exact same in PantrySoft Volunteer as in the core PantrySoft platform. Admins determine what information is needed from volunteers based on which interface the volunteer is using to register or apply.
Note to Admins: Assume “client” is “volunteer” while configuring settings and setting up custom questions for volunteer registration.
Configure System Information:
First, navigate to Setup > Client Settings to configure what system fields you want to Hide, Show or Require of volunteers on your intake form.
Tip: hover over the “i” icon to learn more about each setting.
Configure Custom Questions:
Second, navigate to Setup > Registration Questions or Demographic Questions to set up custom information that can be gathered about volunteers.
See the Custom Question & Picklist Creation article for instructions on configuring Custom Questions; the process is the same in Volunteer.
Step four: Determine New Volunteer Management Workflow
Admins have options regarding allowing new volunteer management:
Option One: One-Step Volunteer Registration
If volunteers should be allowed to complete their registration form and immediately sign up for shifts, the following settings should be configured.
- Set Default Client Status
- Navigate to Setup > Registration Settings
- Scroll to “Kiosk and Storefront Registration” section
- Locate “Default Status for New Clients” setting.
- Type in a Client Status from the Client Status picklist that will indicate an “Approved" Volunteer (This client status requires the same spelling from the Client Status picklist, and it is case sensitive).
- This setting determines what Status Volunteers should have, by default, when they create their own Volunteer Records through the client portal.
- PantrySoft Volunteer has a list of out-of-the-box client statuses, and one is "Approved Volunteer", which is used in the following screenshots.
-
- Navigate to Setup > Shift Frequency Rules
- Ensure there is a Shift Frequency Rule that corresponds to the number of shifts that should be allowed for the default Volunteer status in a given time frame.
In the example below, the “Standard” rule allows for Approved Volunteers to register for four shifts a month:
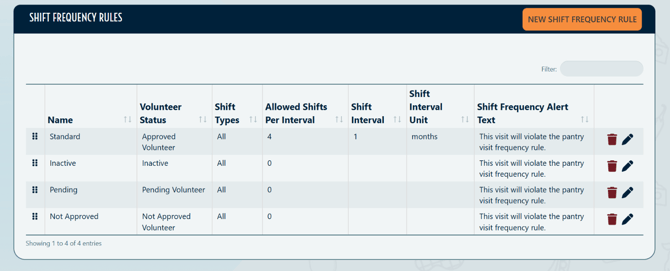
If Volunteers are welcome to sign up for an unlimited number of shifts, admins can delete any rule tied to that Default Volunteer Status altogether.
Option Two: Two-Step Volunteer Registration and Verification
If admins will review volunteer registration information ahead of the volunteer being able to self-schedule a shift on the Portal - more like a volunteer application process - the following settings should be configured:
- Set Default Client Status
- Navigate to Setup > Registration Settings.
- Scroll to “Kiosk and Storefront Registration” section.
- Locate “Default Status for New Clients” setting.
- Type in a Client Status from the Client Status picklist that will indicate an “Pending" Volunteer status (This client status requires the same spelling from the Client Status picklist, and it is case sensitive).
- This setting determines what Status Volunteers should have, by default, when they create their own Volunteer Records through the client portal.
- PantrySoft Volunteer has a list of out-of-the-box client statuses, and one is "Pending Volunteer", which is used in the following screenshots
-
- Save Settings.
- Set Shift Frequency Rules
- Navigate to Setup > Shift Frequency Rules
- Ensure that There is a Shift Frequency Rule of 0 for the default client status, as well as all other Volunteer Statuses that should not be able to book.
- How to fill out the form for a Shift Frequency Rule of 0:

- Ensure there is a Shift Frequency Rule that corresponds to the number of shifts that should be allowed for Volunteers in a given time frame.
-
If volunteers may sign up for unlimited shifts, admins can remove any frequency rule(s) for approved volunteer statuses.
-
- Review and Approve Volunteers
-
- One-by-one:
- Open up the Volunteer Record and review the provided information.
- Select the Edit Pencil icon on the Status row at the top of the Volunteer Record.

- Update the Volunteer Status.
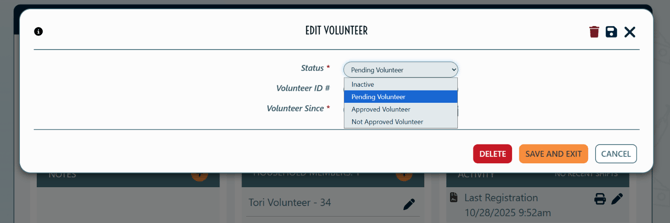
- Save and Exit.
- Batch/Bulk:
- Open the Reporting tab > Select “Dynamic Reports”
- Select the “Volunteers” Dynamic Report
- Use the “Volunteer Status” Filter to only display records with “Pending Volunteer” status.
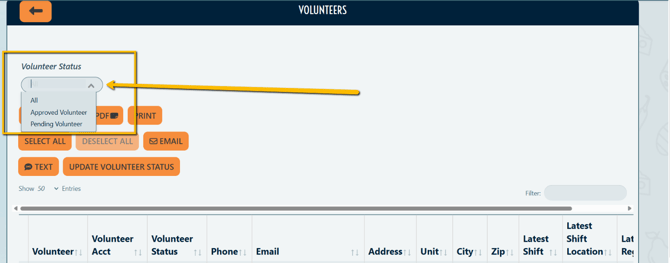
- Review their information within this report or click on data in the row to open up the full Volunteer Record.
- If the Volunteer is to be approved, check the box next to their name.
- OR If all Pending Volunteers are to be approved, click SELECT ALL.
- Open the Bulk Update Tool. Click Update Volunteer Status.
- A popup will appear asking you to select a new status for the selected Volunteers.
- Choose the new, Approved Volunteer Status from the list.
- Click Update.
- One-by-one:
The same process can be followed to change Volunteer Status to “Not Approved”, “Inactive” or a different relevant status in bulk.
Dynamic Report Configuration: For Dynamic Report configuration - including adding registration data - please email support@pantrysoft.com.
Step five: Set Up Shift Self-Scheduling
Shift Scheduling in PantrySoft Volunteer functions exactly as appointment scheduling for the core PantrySoft platform.
If volunteers should be able to sign up for specific Shift Types, ensure that there is a Schedule Template for each.
Please see the following two knowledge base articles for instructions on setting up Schedule Templates in PantrySoft Volunteer:
- Schedule Templates: Basic Setup
- Schedule Templates: Appointment Visibility (for self volunteer self-scheduling)
If volunteers are allowed to book more than one shift at a time on the portal, navigate to Setup > Storefront Settings > set Enable Multiple Storefront Orders to “Yes”.
Admins can also schedule shifts on behalf of Volunteers by selecting "New Appointment" in the Activity Section of the Volunteer Record.
Step six: Record Volunteer Activity
Volunteers signing up for shifts does not automatically equate to volunteers completing shifts in PantrySoft. In order to record actual volunteer activity, ensure that shifts are logged in the PantrySoft platform.
In the Org View/Admin Dashboard:
- Navigate to a Volunteer Record Via:
- Pantry > Browse Clients
- Pantry > Client Search Box
- Pantry > Schedule Calendar > Locate the Date and Time > Select the Silhouette Icon

-
- Reporting > Dynamic Report > select any relevant dynamic report with volunteer data
- Once in the Volunteer Record, select “New Shift”.
- If detailed volunteer activity information is not needed, select Save and Exit.
- If detailed volunteer activity information is needed:
- Click the Plus(+) Icon for “Volunteer Hours”:

- Click the Plus(+) Icon for “Volunteer Hours”:
- Document the Task Type and the Time worked.
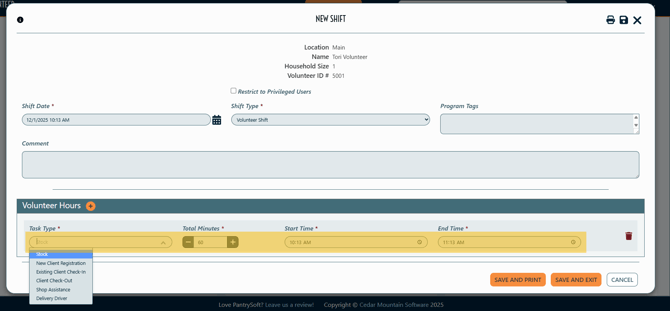
- Select Save and Exit.
Reporting and Communication Tools
Volunteer Platform Reporting Tools
PantrySoft Volunteer comes with a set of pre-configured dynamic reports that provide essential insights into volunteer data, shifts and activity. These reports are designed to be immediately usable, and can be tweaked as needed.
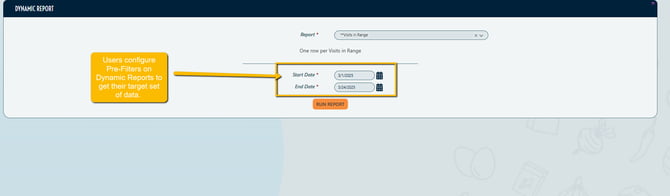
Dynamic Reporting Tips
- Pre-Filters: On many Dynamic Reports, Users configure pre-filters in order to see a specific set of data:
- Sort Order: Dynamic Reports can be sorted by the data in any column by simply toggling the arrows next to that Column's header. For example:
-
-
- Users can sort a dynamic report by date by toggling the arrows on the Date column.
- A User can also sort a dynamic report alphabetically by Name by toggling the arrows in the Name column:

-
- Export: Users can export or print Dynamic Reports by clicking the applicable option near the top of the screen.

The following is a list of the dynamic reports that come out-of-the-box with the PantrySoft Volunteer installation:
- ROSTER Reports
- Volunteers - One row per volunteer in the system. Filterable by Volunteer Status.
- Volunteers Scheduled in Range - One row per Shift Appointment in selected date range.
- Volunteers Attending in Range - One row per Volunteer who had a shift recorded in selected date range.
- EVENT Reports
- Appointments in Range - One row per Shift Appointment in selected date range.
- Shifts in Range - One row per shift recorded in selected date range.
- DIAGNOSTIC Reports
- Non-Scheduled Volunteers - One row per Volunteer in the system NOT scheduled in the selected date range.
- Non-Attending Volunteers - One row per Volunteer in the system that did NOT attend in the selected date range.
Send Mass Communication to Volunteers
Admins can use dynamic reports to send emails and/or SMS messages to filtered lists of volunteers.
Path:
- Open the Reporting tab > Select “Dynamic Reports”
- Select a pre-prepared dynamic report based on the recipient list that is needed.
- See Send Emails and Text (SMS) for detailed instructions.