
Definitions
Basic Terms
A Schedule Template (Setup->Schedule Templates) is a model week that an admin sets up with a pattern of availability. This pattern is a system of (availability) blocks and (capacity) slots. (For instance, a pantry open only one day per week might set up a schedule template for Wednesdays, 10am to 3pm; one block per hour, and 10 appointment slots per each of those blocks.)
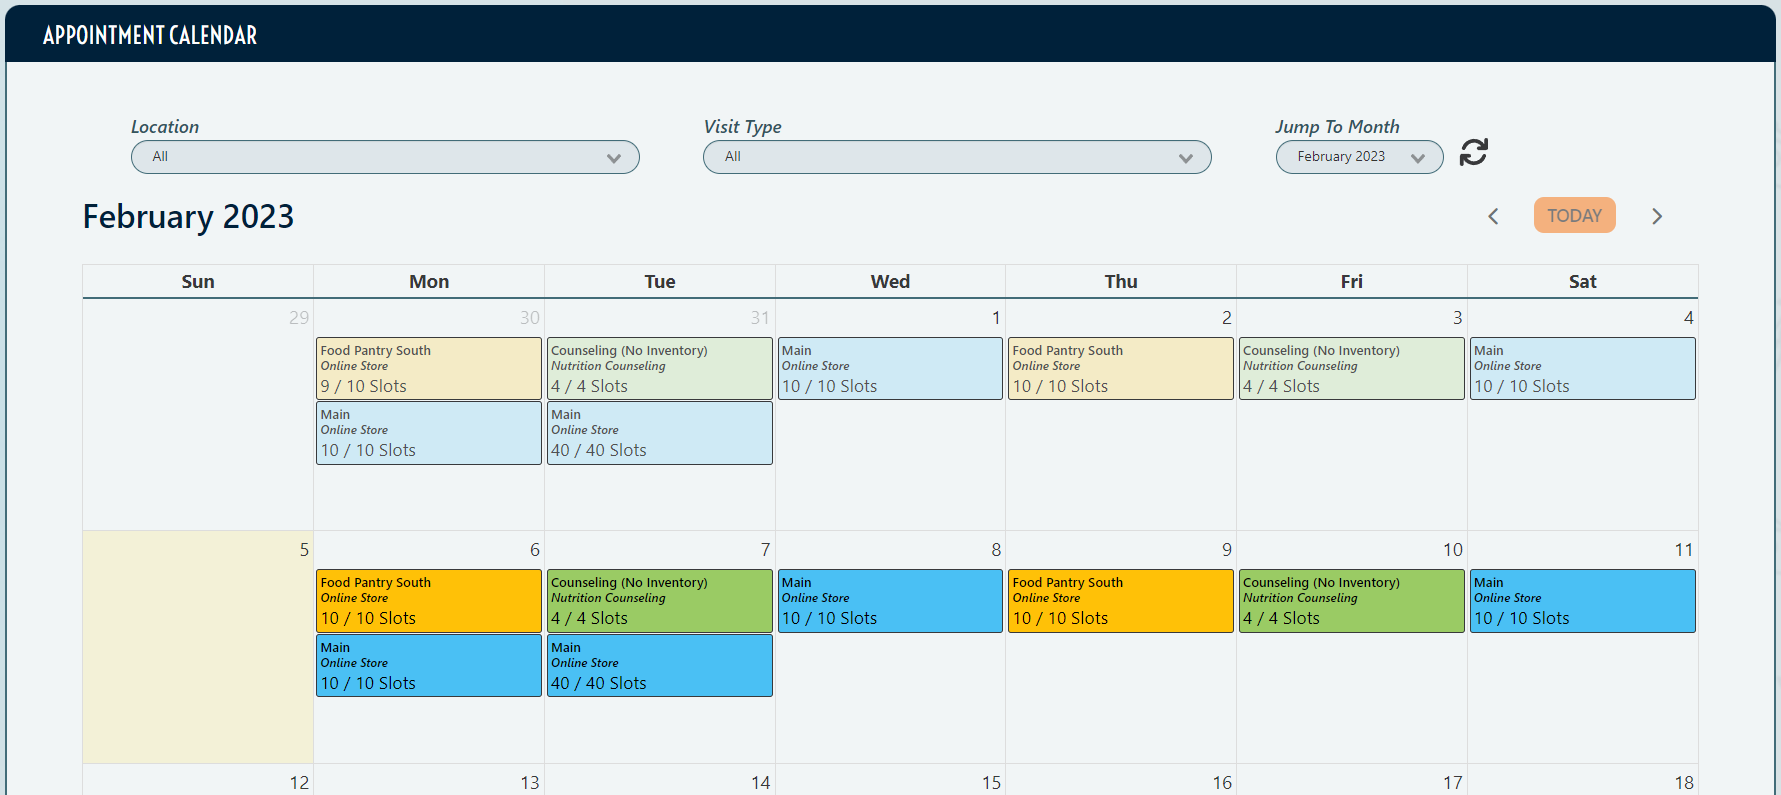
The Scheduling Calendar (Pantry->Schedule Calendar) shows how that/ those schedule templates— those model weeks— express themselves as actual availability. The scheduling calendar also shows the actual Client Appointments occupying available slots throughout the month.
Special Concept: Templates as Visit Type + Location.
Every Schedule Template is designated with a combination of Visit Type and Location (out of the box, PantrySoft has only a Standard Visit Type and Main Location). When a Client schedules an appointment for one of these templates, the Location describes the inventory available to them, and the Visit Type is the pantry program in which they intend to participate.
Creating a Schedule Template
Step A: Start a New Template
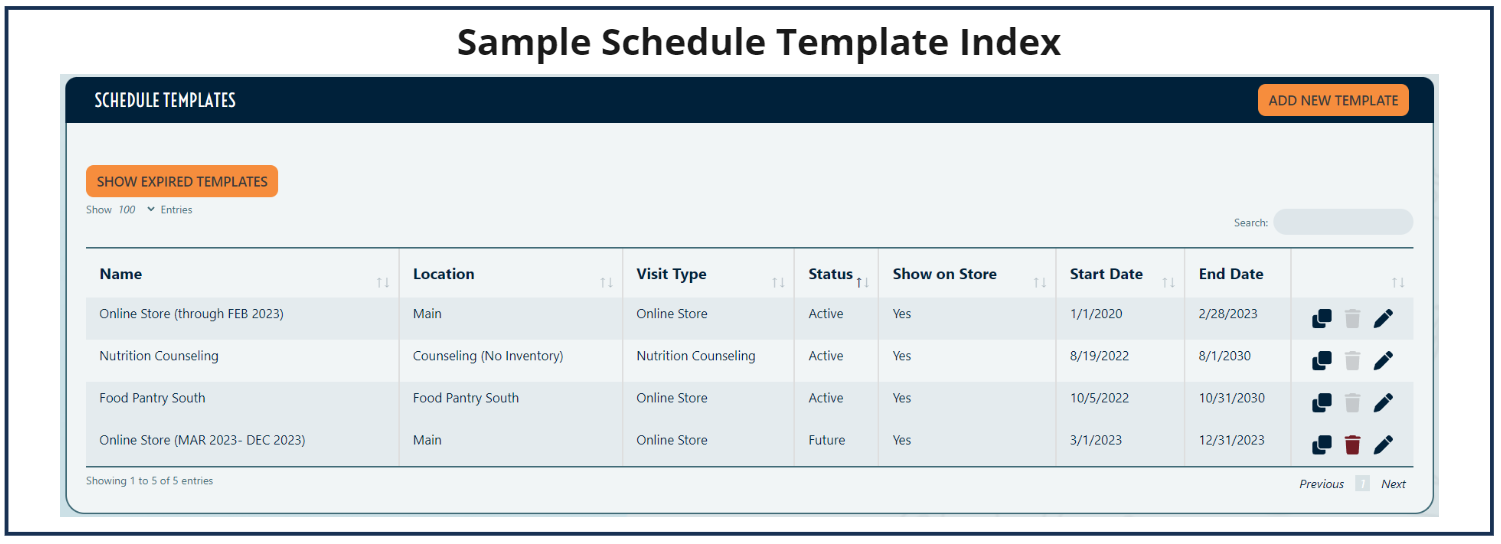
Multiple Templates? As you can see with the number of "Active" templates in the example above, you can create multiple concurrent templates based on different combinations of Location (inventories) and Visit Type (pantry programs).
For example: you might have separate a "Nutrition Counseling" template that provides separate time blocks for patrons who need a special appointment with the nutrition counselor. Like your main template, this template might also take place at your Main Location, but is associated with the Nutrition Counseling program (Visit Type).You could build the Start and End Date concurrent to your main food-distribution template.
Perform the following steps as an Org Admin to create a new schedule template (Pantry->Schedule Calendar):
- Setup > Schedule Templates
- If you do not see this option under the Setup tab, you must "Enable" schedules. To do this: Setup > General Settings > Enable Schedules > Yes.
- New Template
From the top of the Schedule Template Index, click Add New Template.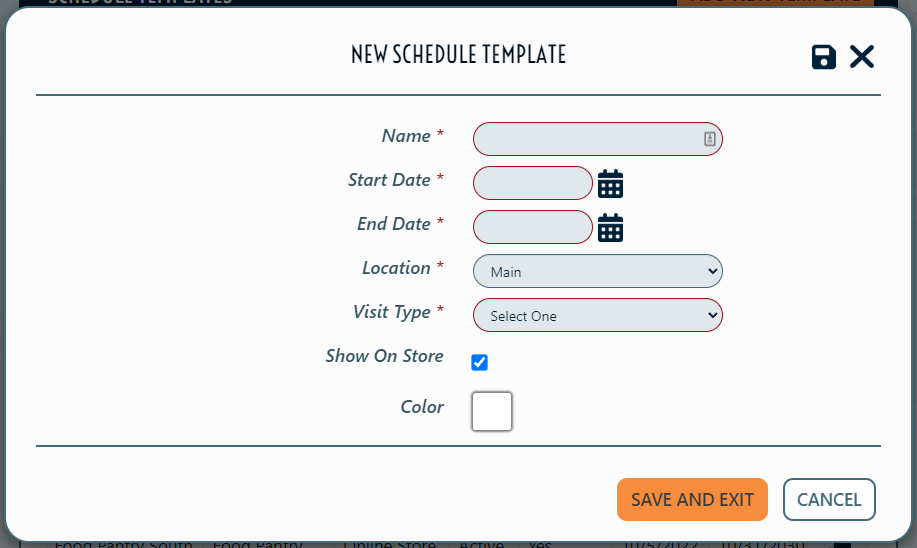
- Template Name and Date Range
Enter a name for your template and select a Start Date and an End Date. - Template Location
If your pantry uses multiple Locations, choose the appropriate Location you intend for this template.
(For example, if you're using these instructions to create an availability pattern for your Downtown Location, select Downtown under Location. Out of the box, PantrySoft comes with a single Location: Main.) - Template Visit Type
After choosing a Location for your Template, you must also choose a Visit Type (pantry program). Out of the box, PantrySoft comes with a single Visit Type: Standard. - Save and Exit
Click Save and Exit, and the screen will show you a blank generic weekly calendar for viewing and adding availability blocks. - (Optional) Select a Color
You can color this calendar to distinguish it from other concurrent calendars if you're running more than one template active at the same time.
Step B: Add Availability Blocks to the New Template
Save Template Button? Clicking Save Template is only necessary after you've made changes to the core fields (i.e., Name, Location, Visit Type, etc.). If you see blocks on the calendar, they've already been saved.
- Now that you have at least one Schedule Template in the index, click on the edit pencil next to it. This will open the Edit Schedule Template Screen.
- From the resulting Edit Schedule Template screen, you can add availability blocks:
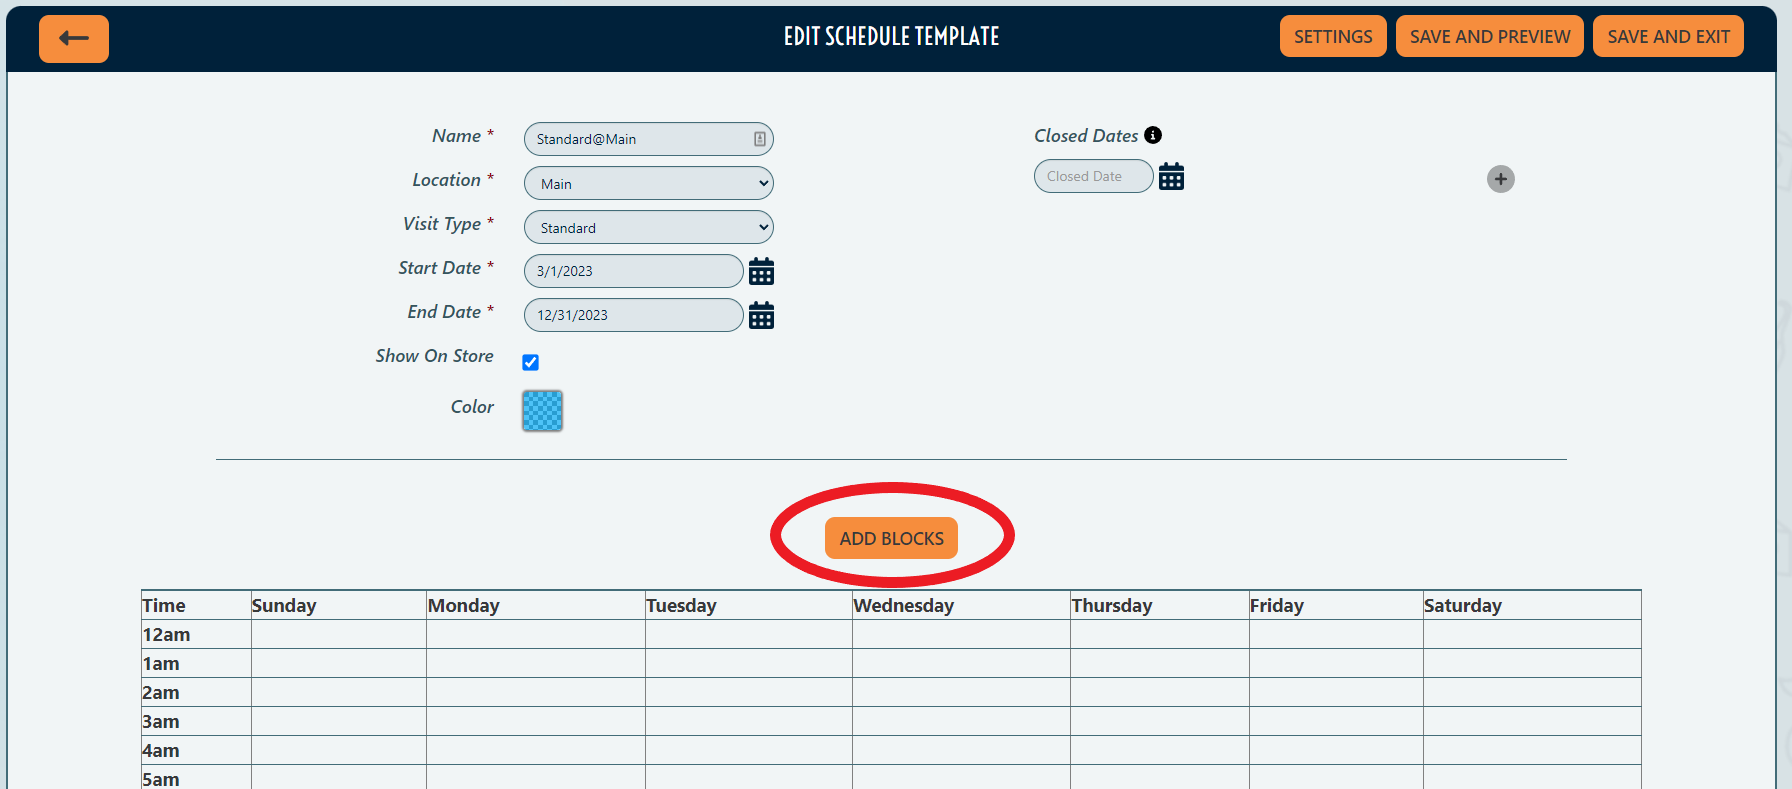
- From the Edit Schedule Template screen, click Add Blocks to see the Add Schedule Template Block popup:

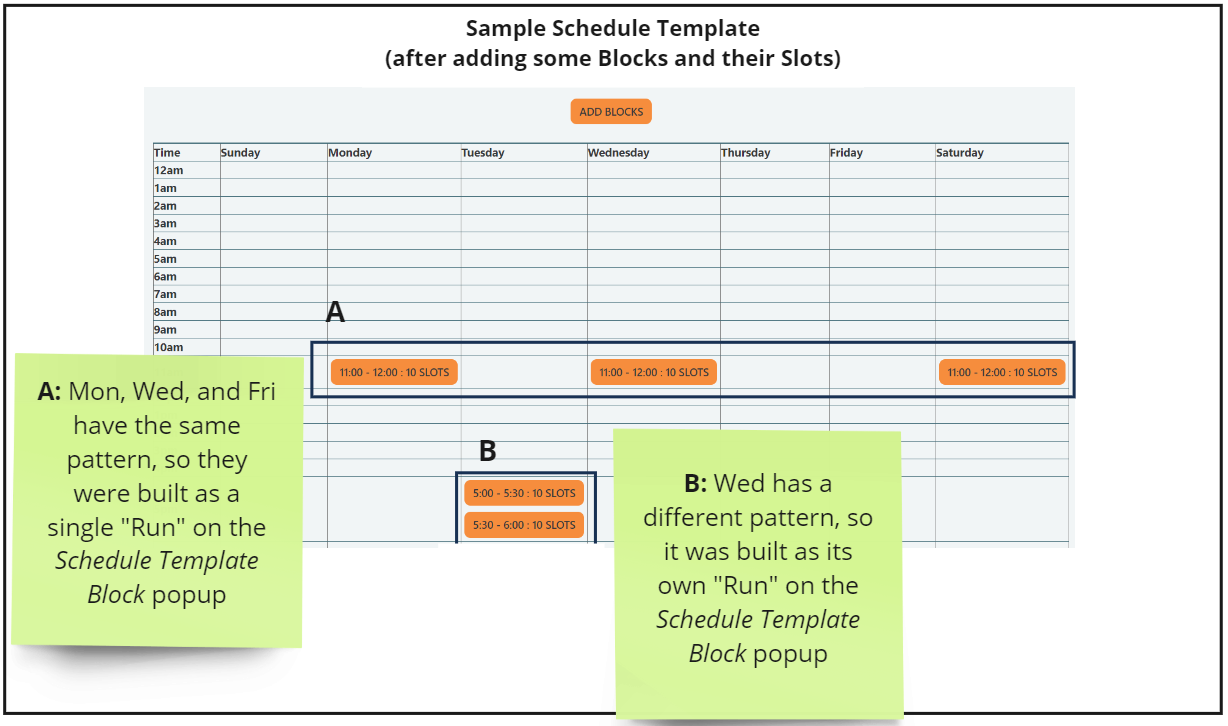
- Use The Add Schedule Template Block pop up screen helps you build a pattern of consecutive, uniform blocks you can apply to multiple days at the same time. For instance, you can create a "run" of 15-minute blocks (with 10 slots apiece) from 10:00am to 1:00pm and apply it to both Wednesdays and Fridays.
Design a "run" of availability blocks for the template using the following fields on the Add Schedule Template Block popup (pictured just above):
- Days of Week: Determine to which days you'll apply this pattern of slots.
- Start Time: Determine the start of the run per-day (for instance, a run that begins at 11am on applicable days).
- End Time: Determine the end of the run per-day (for instance, a run of blocks stops at 3pm on applicable days).
- Minutes Per Block: Determine the size of each block (for instance, entering 15 will fill your "run" from Start to End Date with 15 minute blocks).
- Capacity Per Block. Determine the total number of appointments that can be made per block (for instance, 10 means that each of your blocks will allow 10 people scheduled in that time).
What if I made a mistake? To edit a block once you've built one, just click on the block and an edit screen will appear. Here you can adjust capacity or even delete the block if there are no appointments currently attached to it.
Once you have finished designing your "run" of blocks and clicked Save and Exit, the "run" you designed will manifest as a pattern of blocks (either A or B in the picture below are results of a single "run").
Step C : Verify Blocks and Slots on the Schedule Calendar (Optional)
Once you have created a schedule template and given it some blocks and slots, navigate to Pantry ->Schedule Calendar to see the slot-availability translated into actual dates:
- The sample Appointment Calendar below shows three different Availability Calendars; the result of three different Schedule Templates running inside a month simultaneously. Each template was set up with own color.
- The greyed-out days represent past availability.
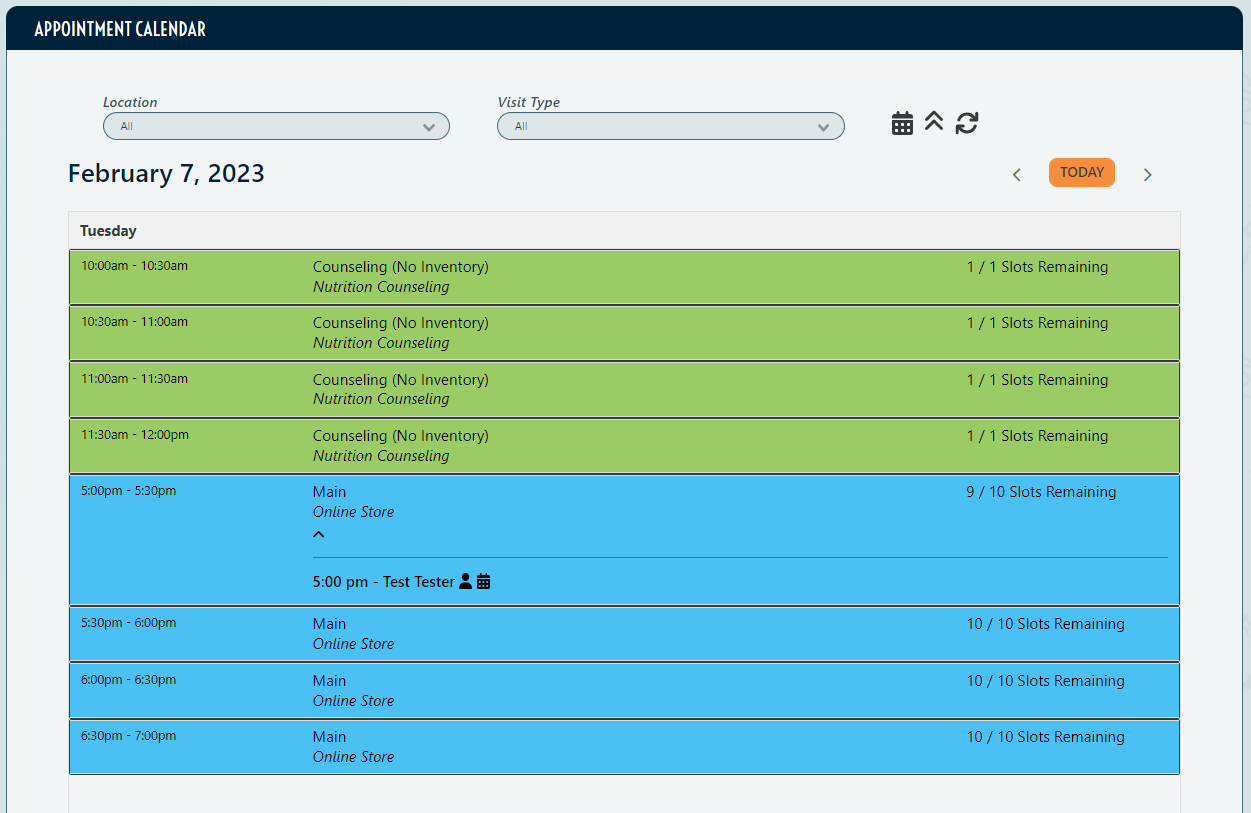
Click on any day to view all of the Schedule Blocks generated by your Schedule Templates for that day, as well as the clients that might have already scheduled for some of those slots:

- Calendar icon returns you to the month-view
- Expansion arrows collapse or expand the actual appointments-per-day (Test Tester's appointment would appear and disappear, along with any others if there were any)
- Refresh icon refreshed the calendar so any alterations made after you loaded it will manifest.
Help! I don't see my slots! If you don't see the blocks and slots you've just set up manifesting on the calendar, go back to the schedule template and confirm that the template's Start Date and End Date(s) overlap the calendar period you were trying to view.
Additional Features
Click on the links below to learn about the following additional schedule template features not included in this Basic Setup article:
- Future Schedule Templates via Duplication. Although you can only have one schedule template for any given "track" (Visit Type + Location) covering the same timespan, you can use the Duplication feature to build them in a series into the future. This allows you to quickly set up a duplicate template (with, say, a slightly different pattern for the holidays) by cloning an Active template and adjusting its Start and End date to pick up sometime after the current one hits its End Date.
- Schedule Template "Closed Dates" Exception Days (i.e. Holidays). Add an exception to the Schedule Calendar pattern, so you can shut down appointment availability on a day the template normally builds appointments.
- Appointment Visibility (Online Portal). Online portal customers schedule their own appointments. Limit how far out from a given appointment your clients can begin to see it. Adjust the "lead time" your staff has to pack an order in advance of its creation.
- Please see this article for more information on Appointment Visibility: Schedule Templates and Appointment Visibility