
In the Inventory Menu, Inventory Items are a list of the "recipes" PantrySoft uses to create actual items attached to either visits or receives. Inventory Item Types are categories you can assign to these individual Inventory Items. You can then use these categories as filters in various inventory reports.
Using Item Types with the Client Portal. When using the Client Portal, you'll typically use Item Types as "item buckets" and then set per-visit limits for each of those buckets. For instance, you can set up a "meat" category and set a limit of 2 meat items per visit.
Using Item Types without the Client Portal. When not using the Client Portal, you can use Item Types in a number of ways:
- You can ignore them, and by default all your items will be assigned to the first item type on the list.
- If you have a lot of items, Item Types can be useful throughout the app for finding individual items more quickly by narrowing your search down to a category.
- Alternatively, you can name Item Types after institutional donors in order to continue to pair an item to a donor long after you've received that item from a particular source.
Creating a New Inventory Item Type
Follow these steps to configure a new Inventory Item Type.
- Access the Inventory Type Screen
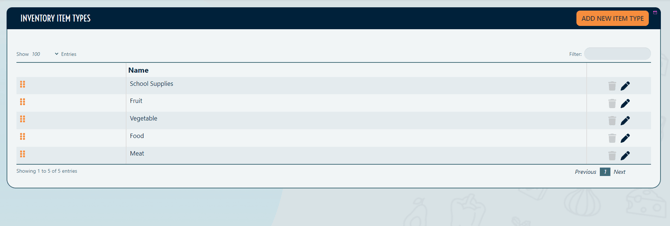
Navigate to Inventory->Item Types. If this is your first time on this screen, this table will be empty.
- Create a New Item Type
Click Add New Item Type to create a new category.

- Enter the Inventory Type's Standard Information (pictured above)
Inventory Types at minimum only require a Name, but there are other configurable options.- Is Active: The item type will be enabled in the app. If you don't use a particular Item Type in your system anymore, deselecting this checkbox will inactivate it while preserving record keeping.
- Show On Visit: The Item Type will be visible on the traditional Client Visit screen.
- Show in Kiosk: (only relevant if you use the Express Kiosk) The Item Type will be visible on the Client Kiosk Visit screen. See Express Kiosk Interface (Staff Kiosk) for more information on how the Express Kiosk system works.
- Is Active: The item type will be enabled in the app. If you don't use a particular Item Type in your system anymore, deselecting this checkbox will inactivate it while preserving record keeping.
- Optional: Enter the Item Type's Online Store Options
Only applies when Online Store is activated. If you do not use this feature, skip to the next step.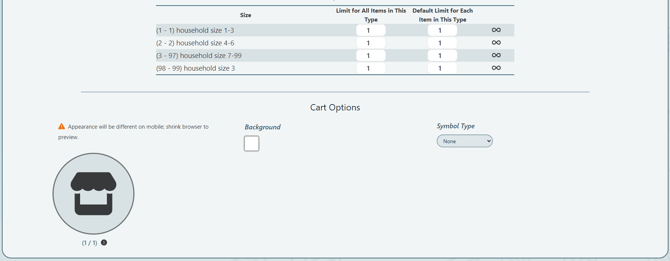
- Limit Per Visit: This option restricts the total amount of items that a client can select per category.
For example: meat might have a limit of two items per household. The client could select, say, one unit of beef and one unit of chicken for a total of two units of meat.
Symbol Type: Select either a preloaded icon or a downloaded image to display on the Client Portal inventory type card (works with most common image file formats): - Icon Symbol
- To select an icon, select Icon on the drop-down menu, then click on the drop-down menu that appears immediately below. Use the arrow keys on the bottom to switch between the pages or click on the Search Icons field to look for a particular icon by name.

Image Symbol To use an image, select Image on the drop-down menu, then click on the pencil icon to Add or Edit a photo. This will open a window to browse for an image.

Select your image and click Open. The image will load in app to the built in image editor.The arrows on the bottom left rotate the image. Delete removes the image and exits back to the Inventory Type screen. Replace opens a new browser window to load a different image. Save confirms any changes and exits. Cancel exits without making any changes.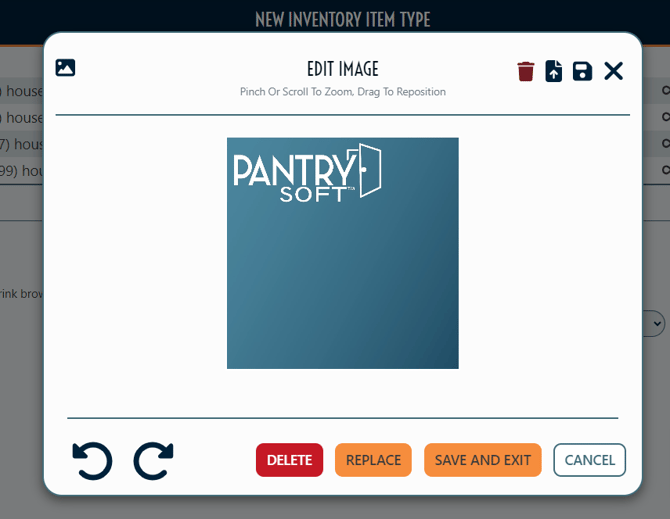
- Background selects a background color for the Inventory Item Type's card on the Client Portal. Use the sliders and click anywhere on palette to adjust your color. You also can select one of the default colors from the row at the bottom. Click Save to record your selection.

- Limit Per Visit: This option restricts the total amount of items that a client can select per category.
- Record Your New Item Type
Once you have finished customizing your Item Type, click Save and Exit to record the information and return to the Inventory Item Types screen.
-
Editing and Deleting Item Types
To manage your existing item type entries, follow these straightforward steps.
Access the Item Type Screen
Begin by navigating to Inventory -> Inventory Item Types.
Locate the Item You Wish to Edit or Delete on the Table
Utilize the following tools to streamline your search process:
Search: Quickly find a specific item type by entering its name in the Search field located at the top right corner.
Show X Entries: Adjust the number of rows displayed on the page by selecting an option from the dropdown menu in the top left corner.
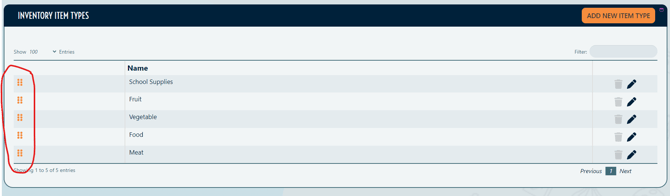
Reorder Rows: To reorganize the table, simply click and drag the handlebars next to each row. You can also use the mouse scroll wheel to navigate up or down the screen while dragging a row.
- To edit an Item Type, simply click the Edit button located in the corresponding row of the Item Type table. This action will open the Edit Inventory Item Type screen, which functions similarly to the New Inventory Item Type screen. After making your desired adjustments, be sure to click Save and Exit to record your changes and return to the Inventory Item Types screen.

-
To Delete an Item Type
To remove an Item Type, simply click the Delete button located next to the Item Type you wish to remove. A confirmation pop-up will appear; please confirm your decision by clicking and holding the Delete button. It is important to note that, in order to maintain accurate database record keeping and reporting, you are unable to delete an Item Type that has been linked to any Inventory Items. In such cases, you can choose to inactivate the Item Type instead by navigating to the Edit Inventory Type screen.