
Definition
In PantrySoft, Inventory Items on the actual Inventory Item screen detailed here are best thought of as templates for the "real" Visit Items and Receive Items. Visit Items and Receive Items are actually quantified and moved as part of a transaction in time, and only derive name and a suggestion of per-unit value and per-unit weight from the Inventory Items (the item templates) you'll set up here.
"Inventory Items" become "Visit Items". To illustrate the relationship between Inventory Items and Visit Items, consider the following: you cannot distribute a Visit Item to a Client without first setting up its template; without first setting up its Inventory Item. Make a "Beef" Inventory Item first, and only then can a "Beef" Visit Item be created and attached to a Visit. The Visit screen uses the Inventory Item's name and certain default values (per-unit weight, per-unit value) to help build a "Beef" Visit Item. But only the resulting Visit Item has a quantity, which makes it an "actual item". Only the Visit Item will be attached to a saved visit complete with a timestamp, and this makes its distribution to the Client an actual event in time.
Granular vs. Bulk. Your Inventory Item scheme is determined in large part by the Items you set up on this screen. Online and choice pantries, for instance, usually need to track outgoing inventory at a granular level, and so might have items as granular as "can of tune". Alternatively, simpler setups might just record food pounds. In the future, look for an upcoming article series on different Inventory Schemes.
Creating an Inventory Item
Follow these steps to set up a new Inventory Item.
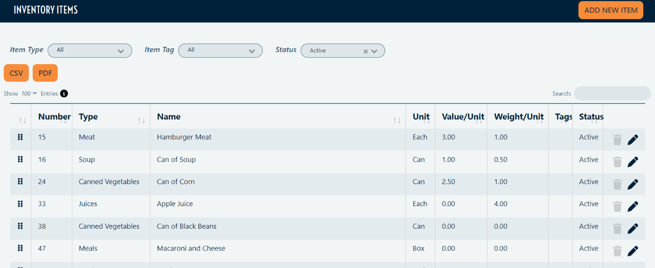
Access the Inventory Item Screen
Navigate to Inventory->Inventory Items. If This is Your First Time on This Screen, This Table Will Be Empty.
Create a New Item
Click New Item. This will take you to the New Inventory Item screen.

- Name the Item
In the Name field, enter a description for the item. This can be as narrow as a specific item (e.g., "Chicken of the Sea" 3.5 oz can tuna) or as broad as a "bag of food" depending on your pantry's reporting needs.
NOTE: Some pantries track their item sources by using an appropriate prefix as in "USDA: Pound of Food".
NOTE: Some pantries help their volunteers know to pair specific items with specific item types (see Inventory Item Types below) by using an appropriate prefix as in "Diaper Program: SM size". -
Assign an Inventory Type
Select an Inventory Item Type for the item. Using Inventory Types allows you to sort your inventory into subcategories (e.g., Bananas could be sorted into the "Fruit" or "Produce" category) See Inventory Item Types for more information on how to set-up Item Types. - Configure Where the Item is Visible
Ensure the boxes for Show on Visit and Active are checked. The following options are enabled (checked) by default:- Active: This checkbox can be deselected to inactivate an item in your inventory. This prevents it from being used in any visits or receives. Note: Inactivating an item, rather than deleting it, will preserve past record keeping.
- Show on Visit: This checkbox can be deselected to hide an item from view in the Client Visit screen. You will still be able to receive and transfer this item, but it will not be visible for Client pick-up.
- Show in Kiosk: (only relevant if you use the Express Kiosk mode for client intake) This checkbox can be deselected to hide an item from view in the Express Kiosk screen. See Express Kiosk Interface (Staff Kiosk) for more information about Express Kiosk visits.
- Show in Store: (only relevant if you use the Client Portal) This checkbox can be deselected to hide the item from being used in the Client Portal screen. However, the item can still be distributed through a traditional visit if Show on Visit is checked.
- Active: This checkbox can be deselected to inactivate an item in your inventory. This prevents it from being used in any visits or receives. Note: Inactivating an item, rather than deleting it, will preserve past record keeping.
- Optional: Assign the Item a Number.
If your pantry has its own serial numbers or other identifiers for goods and services, replace the default item number with your own. (The default number is an integer incremented by one from your current highest item number. Item Numbers must be unique.) - Assign the Item a Unit
Select Unit from the drop-down menu. A Unit is the means by which an item is counted. Bag, Bottle, Box, Can, Each, Ounces, Pounds are the default units available; this list is customizable through editing the Inventory Units picklist in Question Picklists. See Picklists for more information on this topic. - Assign the Item a Value / Unit
Value/Unit is used primarily for reporting purposes. This allows you to aggregate the total monetary value of a given item distributed. Enter '0' if your organization does not track value; for record keeping purposes you must enter a value in this field.Note: Some organizations use this field to track the monetary values of items they have purchased. In that case, donated items are assigned a value of 0.
- Assign the Item a Weight / Unit
Weight/Unit is also used primarily for reporting purposes, allowing you to aggregate total weights of items distributed. Enter '0' if your organization does not track distributed weight; for record keeping purposes you must enter a value into this field. - Optional: Configure the Item's Online Store Options
The following options are only relevant to the Client Portal. If you do not use this feature, skip to the next step.- Assign a Limit Per Visit to the Item
Type a number in the field that represents the maximum quantity of that item that can be selected in the online store. - Assign an Out of Stock Threshold
This field allows you to choose a minimum threshold that is compared against your current inventory. This is often used as a buffer to ensure in-person shoppers will always have access to items available on the client portal. - Assign a Symbol (icon or image) to the Item
Select Symbol Type from the drop-down menu. This allows you to select either a preloaded icon or a downloaded image (works with most common image file formats) to display on the inventory card.
Icon. To select an icon, select Icon on the drop-down menu, then click on the drop-down menu that appears immediately below. Use the arrow keys on the bottom to switch between the pages or click on the Search Icons field to look for a particular icon by name.
Image. To use an image, select Image on the drop-down menu, then click on the pencil icon to Add or Edit a photo. This will open a window to browse for an image.Select your image and click Open. The image will load in the app to the built in image editor.
The arrows on the bottom left rotate the image. Delete removes the image and exits back to the Inventory Type screen. Replace opens a new browser window to load a different image. Save confirms any changes and exits. Cancel exits without making any changes. - Enter a Description for the Item
The Description field lets you enter a more detailed description for the item. This description displays in a pop-up on the Client Portal when the client selects an item.
In the example below, the client has clicked on "Beef" triggering a pop-up to appear on the Client Portal showing the description "Ground Hamburger 80/20".
- Assign a Limit Per Visit to the Item
- Save the New Item
Click Save and Exit. This will take you back to the Inventory Item table, which now shows your new item. The item will appear at the bottom of the table, ordered by Item Number by default.
NOTE: A popular method of mass-recording food is to create a poundage item like “Pound of Food,” set at one pound per unit. This way your intake staff can simply adjust the quantity of the item to match its weight for an easy checkout and accurate records.
Editing and Deleting an Inventory Item
Follow these steps to Edit or Delete existing Inventory Item entries.
- Open the Inventory Item Table
Navigate to Inventory->Inventory Items. - Find the Item to Edit / Delete
Locate the item you wish to edit or delete on the table. Below are a few tools to make this easier:- Search. Locate an item by typing the item name into the Search field on the top right.
- Show X Entries. Limit the number of rows displayed on a page by using the top left drop-down entries menu.
- Re-order Rows. Click and drag the six square table icon on the left side of each row to move that row in the table. Note: while dragging a row you can use the mouse scroll wheel to advance up or down the screen.
- Item Type Filter. Click the Item Type Filter drop-down menu to sort the table by Item Types. For example, you could click "Produce" to filter the table to show only "Produce".
- Search. Locate an item by typing the item name into the Search field on the top right.
- To Edit an Item
Click Edit. The Edit Inventory screen is functionally the same as the New Inventory Item screen. Make any needed edits and click Save and Exit to confirm. Click the Back arrow (<--) button to cancel and return to the Inventory Items table. - To Delete an Item
Click Delete. A confirmation pop-up will load, requiring you to hold and click Delete to finalize.
Note: You cannot delete any item that has been received, distributed, or otherwise used in the app. This is to preserve record-keeping and reporting integrity. The delete button will be grayed out if an item has been used. If you wish to no longer use an item, deactivate it in the Edit Inventory Screen.
Tip: Hover your mouse over any greyed-out button to see a message explaining why that entry cannot be deleted.