---
title: Visit Management
description: Visit Management
---
[Skip to content](https://support.pantrysoft.com/visit-management#main-content)
English
Show submenu for translations
[More support](https://support.pantrysoft.com/kb-tickets/new?hsLang=en)

Open main navigation
Close main navigation
- English
Show submenu for translations
- [More support](https://support.pantrysoft.com/kb-tickets/new)
- [Go to pantrysoft.com](https://app.pantrysoft.com/login)
[Go to pantrysoft.com](https://app.pantrysoft.com/login)
Welcome to the PantrySoft knowledge base. How can we help you?
- There are no suggestions because the search field is empty.
1. [Knowledge Base](https://support.pantrysoft.com/?hsLang=en)
2. [Special Workflows](https://support.pantrysoft.com/special-workflows?hsLang=en)
# Visit Management
## The Visit Management screen is the live working list of Visits in progress. Visits appear as they're created, and marking them fulfilled takes them off the list. Visit Management is previously known as the Queue Report.
**How to access:**
Access is controlled by the **Visit Management** Additional Role at the User level, which is off by default. Turn it on for the staff who need it.
*User Management \> open the User record \> select Visit Management under Additional Roles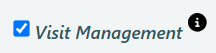*
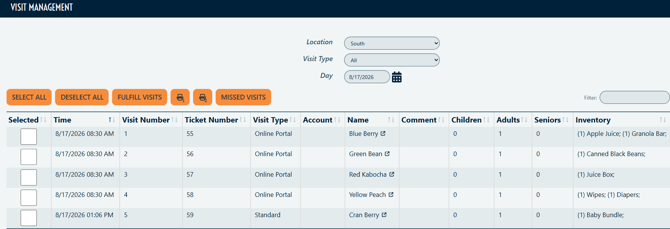
**Once the Additional Roles are assigned, you can access Visit Management.** *Pantry \> Visit Management*
**
A Kiosk Staff User with this setting enabled goes straight to the Visit Management screen when they log in. That's what makes it work as a dedicated station: pair Kiosk Staff as the core role with this setting, and that login does nothing but manage Visits.
### Using the Visit Management Screen
1. Visits appear as they're created. A portal order, a check-in from [Appointment Management](https://support.pantrysoft.com/appointment-management-?hsLang=en), or a Visit entered at the front desk all land here.
2. Pack the order. If setting *Show Inventory on the Management Screen* is enabled, the screen shows any Inventory associated to the Visit, so packing staff/volunteers can work straight from it. To enable this setting, go to *Set Up\> Visit Settings \> Show Inventory on the Management Screen.*

3. Check the box on each visit that's packed.
4. Click Fulfill Visits. The visit is fulfilled, and the row leaves the screen — that household is done and out of the waiting room.
### Filters
Filter by date range, visit type, and location if you have more than one.
### Marking a Visit missed
Marking a Visit missed removes it. If the Visit came from a linked Appointment, that Appointment is marked missed too.
If you don't want certain Users marking Visits as missed, please contact support@pantrysoft.com to make changes to your settings.
### Which screen should we use?
Visit Management has a companion screen, [Appointment Management](https://support.pantrysoft.com/appointment-management-?hsLang=en), which handles the step before a visit exists. Most organizations only need one of the two. Match the screen to the way you use the client portal.
| How you work | Use |
| --- | --- |
| **Online ordering through the client portal.** Placing an order creates the appointment *and* the visit together. | **Visit Management only.** The visits are already here; there's nothing for Appointment Management to do. |
| **Online scheduling only, no ordering** — volunteer shifts, or appointment-only pantries where people book a slot and shop on arrival. | **[Appointment Management](https://support.pantrysoft.com/appointment-management-?hsLang=en) only.** |
| **Waiting-room or drive-thru setup** — people check in at the front, staff pack in the back. | **Both.** Front desk checks people in on [Appointment Management](https://support.pantrysoft.com/appointment-management-?hsLang=en); the back room watches this screen, packs, and clicks Fulfill Visits when the order goes out. |
If you're running the two-station setup in the third row, the two screens are deliberately separate so two people can work them at the same time from different parts of the building.
### Additional details:
- Appointments become Visits, not the other way around**.** A Visit is a record that someone was served. Nothing on this screen creates or reschedules Appointments — for that, use Appointment Management or the Client's Record.
- **Visits created by check-in carry the Appointment's scheduled times**. If someone was checked in from Appointment Management, the Visit's start and end times come from their appointment slot, not their actual arrival. Edit the Visit from the Client Record if you need real times.
- Marking missed on Visit Management is the only way to reverse a check-in. Appointment Management can't undo a check-in, because doing so would mean deleting a Visit. That deletion only ever happens from this screen.
- If you would like to split first and last name columns on the Management Screens, go to *Set Up \> Visit Settings \> Split Name Columns on the Management Screen*
**
- [Getting Started](https://support.pantrysoft.com/getting-started?hsLang=en#main-content)
- [Users](https://support.pantrysoft.com/getting-started?hsLang=en#users)
- [PantrySoft Interfaces](https://support.pantrysoft.com/getting-started?hsLang=en#pantrysoft-interfaces)
- [Inventory](https://support.pantrysoft.com/getting-started?hsLang=en#inventory)
- [Guest/Client Registration](https://support.pantrysoft.com/getting-started?hsLang=en#guest-client-registration)
- [Visits](https://support.pantrysoft.com/getting-started?hsLang=en#visits)
- [Client Portal - Scheduling](https://support.pantrysoft.com/getting-started?hsLang=en#client-portal-scheduling)
- [Reporting](https://support.pantrysoft.com/getting-started?hsLang=en#reporting)
- [Additional Admin Guides](https://support.pantrysoft.com/additional-admin-guides?hsLang=en#main-content)
- [Client Registration & Visits](https://support.pantrysoft.com/additional-admin-guides?hsLang=en#client-registration-visits)
- [Additional Features](https://support.pantrysoft.com/additional-admin-guides?hsLang=en#additional-features)
- [Inventory Management](https://support.pantrysoft.com/additional-admin-guides?hsLang=en#inventory-management)
- [Additional Paid Features](https://support.pantrysoft.com/additional-admin-guides?hsLang=en#additional-paid-features)
- [Tags](https://support.pantrysoft.com/additional-admin-guides?hsLang=en#tags)
- [Scheduling Appointments](https://support.pantrysoft.com/additional-admin-guides?hsLang=en#scheduling-appointments)
- [Scheduling and Schedule Templates](https://support.pantrysoft.com/scheduling-and-schedule-templates?hsLang=en)
- [User Interfaces](https://support.pantrysoft.com/user-interfaces?hsLang=en#main-content)
- [Client Portal/ Online Store- Admin & Setup Guides](https://support.pantrysoft.com/user-interfaces?hsLang=en#client-portal-online-store-admin-setup-guides)
- [Client Portal/ Online Store- Customer Guides](https://support.pantrysoft.com/user-interfaces?hsLang=en#client-portal-online-store-customer-guides)
- [Packing/ Kitchen Screens and Reports](https://support.pantrysoft.com/user-interfaces?hsLang=en#packing-kitchen-screens-and-reports)
- [Special Workflows](https://support.pantrysoft.com/special-workflows?hsLang=en#main-content)
- [Delivery/Meals on Wheels](https://support.pantrysoft.com/special-workflows?hsLang=en#delivery-meals-on-wheels)
- [University](https://support.pantrysoft.com/special-workflows?hsLang=en#university)
- [FAQ & Miscellaneous](https://support.pantrysoft.com/faq-miscellaneous?hsLang=en#main-content)
- [Client Troubleshooting](https://support.pantrysoft.com/faq-miscellaneous?hsLang=en#client-troubleshooting)
- [Other FAQs](https://support.pantrysoft.com/faq-miscellaneous?hsLang=en#other-faqs)
- [Messaging and Notifications](https://support.pantrysoft.com/faq-miscellaneous?hsLang=en#messaging-and-notifications)
- [Other Reports](https://support.pantrysoft.com/faq-miscellaneous?hsLang=en#other-reports)
- [Technical Documentation](https://support.pantrysoft.com/faq-miscellaneous?hsLang=en#technical-documentation)
- [Reporting Tools](https://support.pantrysoft.com/reporting-tools?hsLang=en#main-content)
- [Merging Duplicate Client Accounts](https://support.pantrysoft.com/reporting-tools?hsLang=en#merging-duplicate-client-accounts)
- [Release Notes](https://support.pantrysoft.com/release-notes?hsLang=en#main-content)
- [2026 Releases](https://support.pantrysoft.com/release-notes?hsLang=en#2026-releases)
- [2025 Releases](https://support.pantrysoft.com/release-notes?hsLang=en#2025-releases)
- [2024 Releases](https://support.pantrysoft.com/release-notes?hsLang=en#2024-releases)
- [Recorded Webinars](https://support.pantrysoft.com/recorded-webinars?hsLang=en#main-content)
- [2026 Webinar Recordings](https://support.pantrysoft.com/recorded-webinars?hsLang=en#2026-webinar-recordings)
- [2025 Webinar Recordings](https://support.pantrysoft.com/recorded-webinars?hsLang=en#2025-webinar-recordings)
- [Special/ Niche Features](https://support.pantrysoft.com/special-niche-features?hsLang=en)
- [Advanced Inventory](https://support.pantrysoft.com/advanced-inventory?hsLang=en)
- [CSFP Module](https://support.pantrysoft.com/csfp-module?hsLang=en#main-content)
- [CSFP Overview](https://support.pantrysoft.com/csfp-module?hsLang=en#csfp-overview)
- [Managing CSFP Participants](https://support.pantrysoft.com/csfp-module?hsLang=en#managing-csfp-participants)
- [Recording CSFP Visits](https://support.pantrysoft.com/csfp-module?hsLang=en#recording-csfp-visits)
- [CSFP Data Management](https://support.pantrysoft.com/csfp-module?hsLang=en#csfp-data-management)
- [PantrySoft Volunteer](https://support.pantrysoft.com/pantrysoft-volunteer?hsLang=en)
# PantrySoft
pantrysoft.com Help Center
Copyright © 2026, PantrySoft